


DUAL RATE LINEAR LOWERING SPRINGS
RELEASE OF LIABILITY AND PRODUCT WARRANTY
READ CAREFULLY – THIS AFFECTS YOUR LEGAL RIGHTS
This product carries a lifetime warranty against mechanical failure or corrosion. It can be exchanged for an identical item or a similar item as determined by Unplugged Performance. It may not be returned for cash or credit. There is no warranty regarding surface imperfections or aesthetic damage incurred during regular use, and/or damage to the brackets from an impact or other unusual driving circumstance.
By installation or use of this product you understand and agree with the following. If you do not agree, do not proceed with installation and return this product within 30 days for a full refund of the purchase price from the company from which you have purchased.
- I understand and agree that this product is intended to be installed for use on private roads and in jurisdictions where the use of this product is deemed legal by the local authorities. Furthermore I understand and agree Unplugged Performance does not have any knowledge or control of regulations in my local jurisdiction and it is up to me to determine if the product is acceptable for use with my vehicle.
- I understand and agree that this product affects the ride height of the vehicle and may make the vehicle more susceptible to damage from road debris, dips, inclines and other road hazards. Furthermore I understand that ride height adjustment may make the vehicle perform differently in emergency scenarios or in the event of a vehicle crash or impact. Furthermore I understand that Unplugged Performance has done testing of this product on road and on closed race tracks but does not have the ability to test the vehicle for localized standards and regulations.
- I understand and agree that lowering my vehicle will, in certain circumstances, require a different driving style and reduced speeds.
- I understand and agree that if the vehicle manufacturer determines that the lowered ride height contributed to a problem with the vehicle it may affect the vehicle’s warranty. Furthermore, I understand and agree that Unplugged Performance has no duty nor ability to be involved in internal manufacturer decisions.
- I understand and agree that if this product is given to an installer for installation on my vehicle, I have read and agreed with all of the previous, even if I myself am not personally installing these parts on my vehicle. Furthermore, I understand and agree that this product should be installed by a trained professional that is familiar with both the vehicle as well as this product in particular. Furthermore, I understand and agree that I and/or my chosen installer will follow the installation instructions carefully and dutifully test the vehicle post-installation in a safe and controlled environment to ensure that it is operating properly.
- I understand and agree that by installing this product Unplugged Performance and all associated persons and entities as well as the vehicle manufacturer and all associated entities must be held harmless in the event of any suit, damages, or other legal action. Furthermore, I hereby release Unplugged Performance and any associated entities from any and all liability for any potential claim or claims.
If you do not agree with any of the above statements you should return the product immediately.

PLEASE NOTE:
IF YOUR SPRINGS HAVE RUBBERIZED BLACK ISOLATOR WRAPS AROUND THE COILS, KEEP THEM ON FOR INSTALLATION.
The vehicle must be lifted completely off of the ground and remain as such during the entire installation process.
NOTE: PLEASE CUT BUMP STOPS IN HALF FOR BOTH FRONT AND REAR TO ENSURE CAR DOES NOT DRIVE INTO THE BUMP STOPS. FAILURE TO DO THIS MAY RESULT IN NOISE.
REMOVE FRUNK TRIM PANELS


Prior to installation, the wheels, as well as the inner frunk trim panels must be removed for installation on all vehicles. To do so, begin by removing the plastic upper cowl cover trim panel (below the windshield) (FIGURE-1 ORANGE)
Next, flip up the small caps (FIGURE-1 YELLOW) and remove the two 10mm bolts.
Remove the front trim panel and lift up the rug and find the additional 10mm bolts securing lower section of the frunk tub to the chassis and remove them (FIGURE-2 YELLOW).
REMOVE FRONT DAMPER & SPRING ASSEMBLIES
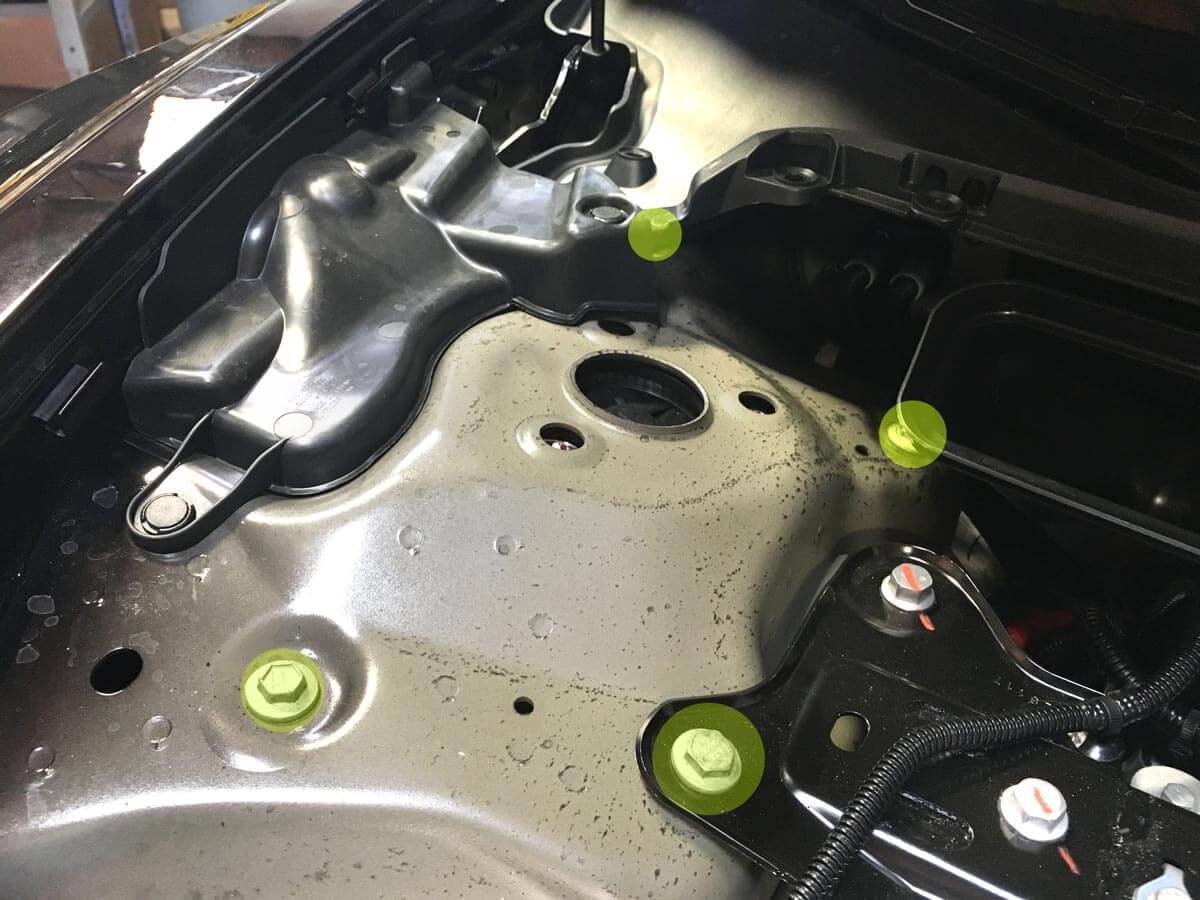


Once the frunk tub is removed, on either shock tower, there will be four bolts visible which secure the upper shock mount to the chassis (FIGURE-3 YELLOW)
Remove the nut attaching the sway bar end link to the damper assembly (FIGURE-4 GREEN).
Remove the bolt attaching the damper assembly to the lower control arm. (FIGURE-4 BLUE).
To complete removal of the front shock assembly, remove the bolt and nut clamping the front upper A-arm’s ball joint to hub / carrier (FIGURE-5 YELLOW).
REMOVE FRONT SUSPENSION TOP MOUNT


Remove the three nuts securing the top mount of the shock to the front upper control arm mount (FIGURE-7 ORANGE). Set the upper control arm + control arm mount aside.
Next the OEM springs must be compressed and secured prior to removal of the damper’s top mount.
NOTE: A SET OF COIL SPRING COMPRESSORS IS RECOMMENDED (FIGURE-6 PURPLE).
Once the springs are securely compressed, remove the top dust cap (FIGURE-7 PINK), to access the nut securing the top mount to damper assembly. Remove this nut to release the top mount.
INSTALL U.P. SPRINGS ONTO THE OEM DAMPERS & REINSTALL


Next carefully remove the spring compressors from the OEM springs and transfer them to the U.P. Dual Rate Lowering Springs.
Follow steps 2 & 3 in reverse to reinstall the spring and shock assemblies.
***NOTE: Do not fully torque fasteners until the vehicle is supported by its own weight (either using a 4-post lift, or wheel lifts like Race Ramps)
Recommended Torque Specs:
- 3 nuts used to attach the top mount to the control arm mount – 17 ft⋅lb / 23Nm
- 2 larger bolts to reattach the control arm mount to the chassis is 46 ft⋅lb / 62Nm
- I understand and agree that lowering my vehicle will, in certain circumstances, require a different driving style and reduced speeds.
- 2 smaller bolts to reattach the control arm mount to the chassis is 26 ft⋅lb / 35Nm
- Bolt/nut combination for clamp on knuckle to reattach upper control arm ball joint – 41 ft⋅lb / 56Nm
- Sway bar end link nut to damper – 73 ft⋅lb / 98Nm
REMOVE REAR SPRING ASSEMBLIES


To remove the rear spring, begin by removing the protective plastic cover from the rear control arm / spring perch (FIGURE-11 YELLOW).
Using a transmission jack, apply upward pressure to the underside of the control arm / spring perch to slighly compress the rear spring.
With pressure still applied, remove the bolt and nut securing the control arm / spring perch to the hub (FIGURE-11 BLUE), as well as the bolt and nut securing the bottom of the shock to the control arm (FIGURE-11 GREEN).
Once the bolts are remove, slowly lower the jack to gently uncompress the spring (the spring will need to be fully uncompressed – no tension).
The OEM spring should now be loose and capable of being removed.
Next, loosen the two bolts attaching the OEM damper to the vehicle’s chassis and remove the assembly (FIGURE-12 ORANGE).
INSTALL REAR SPRINGS


You will need to reuse the factory top and bottom rubber insulator pads (FIGURE-12 GREEN) when installing your new U.P. springs. **Be sure to install the spring and insulators in the correct orientation!
Next, you will need the transmission jack used to remove the factory spring again. With the jack under the lower perch, place the spring and insulators into the spring bucket area. (Applying gentle pressure with the jack may help with the positioning process.)
Using the jack, lift the OEM spring bucket until the bolts for the rear dampers, as well as the hub can be reinserted. Reattach nuts and tighten (recommended torque 85 ft⋅lb / 115Nm).
*** NOTE: Do not fully torque fasteners until the vehicle is supported by its own weight (either using a 4-post lift, or wheel lifts like Race Ramps)
Reinstall wheels.
Congratulations on your new springs!
***WE RECOMMEND PERFORMING A VEHICLE SUSPENSION ALIGNMENT ONCE THE INSTALLATION HAS BEEN COMPLETED***
PLEASE NOTE:
MAKE SURE TO TORQUE WHEELS TO 129LBS/FT

• Every set of Unplugged Performance Dual Rate springs are engineered in a highly specific way for the intended vehicle configuration. Results of unintended applications are unsupported and not advised. Please ensure that the spring purchased is correct for your specific Model 3 in terms of battery pack size and RWD or dual motor configuration.
• If you have purchased used springs, please verify the original purchase invoice to ensure you have the correct spring for your car before installing.
• The Spring needs to be seated correctly. Please ensure that the spring is pressed against the stop at the bottom of the shock body. If it is not, the shock needs to be removed so that the spring can be re-seated correctly.
• Check all nuts and bolts and ensure they are tight and correctly torqued to spec. Step 4 of the installation guide details this.
• Have a Mid Range Battery Pack Car? There is no specific spring engineering for the extremely low production run Mid Range Pack cars. The long range RWD spring sets we make can be installed but may not provide the intended height results due to variances in vehicle weight.
• Have a Standard Range Battery Pack Car? All of our Long Range RWD springs should not be fitted to Standard Range cars. The reason is that Standard Range cars require their own dedicated spring engineering, which we list as a Standard Range specific spring. Fitting Long Range RWD springs to a Standard Range car will result in abnormal vehicle ride heights as the vehicle total weight and weight distribution is different than Long Range battery equipped cars.
IF YOU ARE EXPERIENCE ISSUES NOT OUTLINED ABOVE, PLEASE CONTACT SUPPORT@UNPLUGGEDPERFORMANCE.COM


