


SPORTS AIR SUSPENSION LOWERING KIT
RELEASE OF LIABILITY AND PRODUCT WARRANTY
READ CAREFULLY – THIS AFFECTS YOUR LEGAL RIGHTS
This product carries a lifetime warranty against mechanical failure or corrosion. It can be exchanged for an identical item or a similar item as determined by Unplugged Performance. It may not be returned for cash or credit. There is no warranty regarding surface imperfections or aesthetic damage incurred during regular use, and/or damage to the brackets from an impact or other unusual driving circumstance.
By installation or use of this product you understand and agree with the following. If you do not agree, do not proceed with installation and return this product within 30 days for a full refund of the purchase price from the company from which you have purchased.
- I understand and agree that this product is intended to be installed for use on private roads and in jurisdictions where the use of this product is deemed legal by the local authorities. Furthermore I understand and agree Unplugged Performance does not have any knowledge or control of regulations in my local jurisdiction and it is up to me to determine if the product is acceptable for use with my vehicle.
- I understand and agree that this product affects the ride height of the vehicle and may make the vehicle more susceptible to damage from road debris, dips, inclines and other road hazards. Furthermore I understand that ride height adjustment may make the vehicle perform differently in emergency scenarios or in the event of a vehicle crash or impact. Furthermore I understand that Unplugged Performance has done testing of this product on road and on closed race tracks but does not have the ability to test the vehicle for localized standards and regulations.
- I understand and agree that lowering my vehicle will, in certain circumstances, require a different driving style and reduced speeds.
- I understand and agree that if the vehicle manufacturer determines that the lowered ride height contributed to a problem with the vehicle it may affect the vehicle’s warranty. Furthermore, I understand and agree that Unplugged Performance has no duty nor ability to be involved in internal manufacturer decisions.
- I understand and agree that if this product is given to an installer for installation on my vehicle, I have read and agreed with all of the previous, even if I myself am not personally installing these parts on my vehicle. Furthermore, I understand and agree that this product should be installed by a trained professional that is familiar with both the vehicle as well as this product in particular. Furthermore, I understand and agree that I and/or my chosen installer will follow the installation instructions carefully and dutifully test the vehicle post-installation in a safe and controlled environment to ensure that it is operating properly.
- I understand and agree that by installing this product Unplugged Performance and all associated persons and entities as well as the vehicle manufacturer and all associated entities must be held harmless in the event of any suit, damages, or other legal action. Furthermore, I hereby release Unplugged Performance and any associated entities from any and all liability for any potential claim or claims.
If you do not agree with any of the above statements you should return the product immediately.

PLEASE NOTE:
Before attempting installation, the car will need to be placed on the highest suspension setting, as well as secured in “JACK MODE.”
REMOVE OEM FRONT LEFT BRACKET
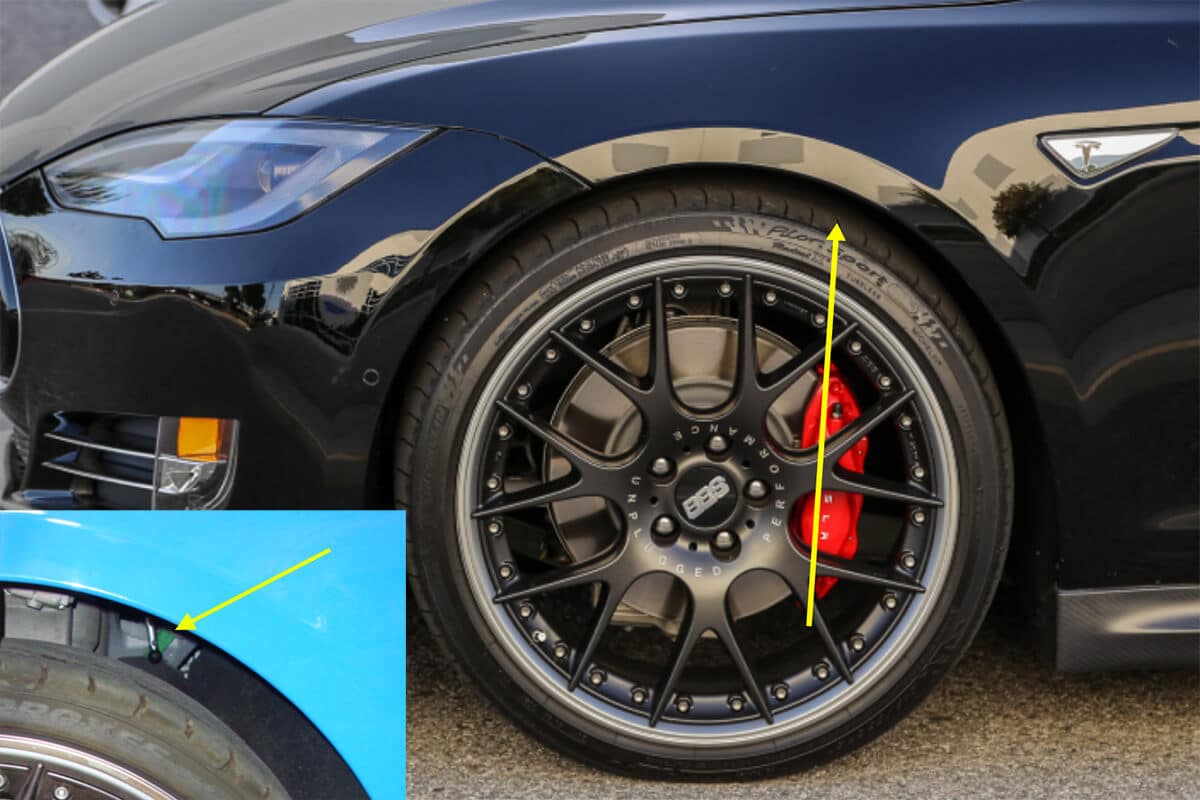


Refer to the area indicated in FIGURE-1. While looking in between the top of the tire and the fender, the suspension bracket and height sensor should now be visible (FIGURE-1 SUB).
The OEM suspension bracket will now be removed, to do so, a ratcheting wrench, along with a 10mm deep socket, as well as a long extension will be required (FIGURE-2).
To remove the suspension bracket, loosen and remove the 10mm nut holding the bracket to the chassis of the vehicle (FIGURE-3).
REMOVE OEM FRONT LEFT BRACKET


Carefully pry the plastic sensor arm away from its attachment point on the front upper suspension member to release it (FIGURE-4).
Next, using a T20 or T25 Torx driver (varies by production date of vehicle), remove the two screws (earlier Model S vehicles will use bolts) that attach the OEM height sensor to the bracket (FIGURE-5).
INSTALL THE FRONT LEFT BRACKET


Locate the Front Left Bracket from your Unplugged Performance Sports Dynamic Air Suspension Upgrade Kit (FIGURE-6).
Note the “SP” setting etched on the bracket. Using the screws / bolts removed from the OEM suspension bracket, install the OEM height sensor onto the U.P. bracket as shown. The sensor should be “clocked” so that the screws pass through the diagonally-opposing holes
NOTE: Be careful to install exactly as shown (FIGURE-7), failure to do so may cause improper operation, and possible damage to your air suspension system.
Following the removal process in reverse, reinstall the bracket and sensor on the car (FIGURE-9).
NOTE: You may or may not require a pair of pliers to squeeze and reattach the sensor arm to the suspension member.

If your Model S is one of a small percentage of very early production vehicles (2012-2013), it may feature an additional stud on either side to retain the front brackets (FIGURE-S). The retaining tab at the bottom of the bracket will need to be removed, and an additional hole will need to be marked and drilled to accommodate this mounting style. We can provide a template via email if necessary.
INSTALL THE FRONT RIGHT BRACKET


Next, move onto the right side of the vehicle and repeat steps 5-9 to remove the OEM suspension bracket.
Locate the Front Right bracket from your Unplugged Performance Sports Dynamic Air Suspension Upgrade Kit (FIGURE-10).
Note the “SP” setting etched on the bracket. Using the screws / bolts removed from the OEM suspension bracket, install the OEM height sensor onto the U.P. bracket as shown. The sensor should be “clocked” so that the screws pass through the diagonally-opposing holes.
NOTE: Be careful to install exactly as shown in the photo, failure to do so may cause improper operation, and possible damage to your air suspension system.
Following the removal steps in reverse, reinstall the bracket and sensor on the car (FIGURE-12).
NOTE: You may or may not require a pair of pliers to squeeze and reattach the sensor arm to the suspension member.
REMOVE OEM REAR BRACKETS


To install the rear brackets,the rear wheels of the vehicle must be removed. To do so, the rear of the car will need to be lifted. This can be achieved either by automotive lift or floor jack.
Once the rear wheels are removed, begin by locating the OEM suspension bracket, mounted to the inner chassis (FIGURE-13)
To remove the suspension bracket, please refer to the process outlined for the front brackets.
Carefully pry the plastic sensor arm away from its attachment point on the suspension arm to release it (FIGURE-14).
Next, using a T20 or T25 Torx driver (varies by production date of vehicle), remove the two screws (earlier Model S vehicles will use bolts) that attach the OEM height sensor to the bracket (FIGURE-15).
INSTALL THE REAR RIGHT BRACKET


Locate the Rear Right bracket from your Unplugged Performance Sports Dynamic Air Suspension Upgrade Kit (FIGURE-16).
Note the “SP” setting etched on the bracket. Using the screws / bolts removed from the OEM suspension bracket, install the OEM height sensor onto the U.P. bracket as shown. The sensor should be “clocked” so that the screws pass through the diagonally-opposing holes (FIGURE-17).
NOTE: Be careful to install exactly as shown in the photo, failure to do so may cause improper operation, and possible damage to your air suspension system.
Following the OEM bracket uninstallation in reverse, install the bracket and sensor onto the car (FIGURE-18).
NOTE: You may or may not require a pair of pliers to squeeze and reattach the sensor arm to the suspension member.
INSTALL THE LEFT REAR BRACKET


Next, move on to the left side of the vehicle and repeat the process for removing the left rear OEM suspension bracket.
Locate the Left Rear bracket from your Unplugged Performance Sports Dynamic Air Suspension Upgrade Kit (FIGURE-19).
Note the “SP” setting etched on the bracket. Using the screws / bolts removed from the OEM suspension bracket, install the OEM height sensor onto the U.P. bracket as shown. The sensor should be “clocked” so that the screws pass through the diagonally-opposing holes (FIGURE-20).
NOTE: Be careful to install exactly as shown in the photo, failure to do so may cause improper operation, and possible damage to your air suspension system.
Following the removal steps in reverse, reinstall the bracket and sensor onto the car (FIGURE-21).
NOTE: You may or may not require a pair of pliers to squeeze and reattach the sensor arm to the suspension member.
COMPLETION
Reinstall your rear wheels.
Lower the vehicle to the ground, and using a torque wrench, tighten the lug nuts on all 4 wheels to 129lbs/ft (190kg/m).
Ensure that all of the doors on the vehicle are closed, and while depressing the brake pedal, press the “JACK” button to disable “Jack Mode.”
Test the suspension heights by cycling through each of the four available settings, from “Very High” to “Low.”
NOTE: If any issues are encountered, stop adjustment immediately and contact us.
If all settings are functioning properly, then you have completed the installation.
PLEASE NOTE:
MAKE SURE TO TORQUE WHEELS TO 129LBS/FT


