
Tesla Model S (2021 - 2026+)
Tesla Model S UP Sports Dynamic Air Suspension Lowering Kit
INSTALLATION GUIDE
- Passenger front lowering bracket
- Driver front lowering bracket
- Passenger rear lowering bracket
- Driver rear lowering bracket
- Vehicle lift
- Torque Wrench
- Exterior trim clip removal tool
- Ratcheting wrench
- 10mm socket
- 10mm end wrench
- Extension
- T20 torx bit
- Large set of pliers (for convenience)

By installing or using this product, you understand and agree with the following: If you do not agree, do not proceed with the installation and return this product within 30 days for a full refund of the purchase price from the company from which you have purchased it.
- I understand and agree that this product is intended to be installed for use on private roads and in jurisdictions where the use of this product is deemed legal by the local authorities. Furthermore, I understand and agree Unplugged Performance does not have any knowledge or control of regulations in my local jurisdiction, and it is up to me to determine if the product is acceptable for use with my vehicle.
- I understand that Unplugged Performance has done testing of this product on road and on closed racetracks but does not have the ability to test the vehicle for localized standards and regulations.
- I understand and agree that if the vehicle manufacturer determines that any Unplugged Performance products have contributed to a problem with the vehicle it may affect the vehicle’s warranty. Furthermore, I understand and agree that Unplugged Performance has no duty nor ability to be involved in internal manufacturer decisions.
- I understand and agree that if this product is given to an installer for installation on my vehicle, I have read and agreed with all the previous, even if I am not personally installing these parts on my vehicle. Furthermore, I understand and agree that this product should be installed by a trained professional that is familiar with both the vehicle as well as this product. Furthermore, I understand and agree that I and/or my chosen installer will follow the installation instructions carefully and dutifully test the vehicle post-installation in a safe and controlled environment to ensure proper operation.
- I understand and agree that by installing this product Unplugged Performance and all associated persons and entities as well as the vehicle manufacturer and all associated entities must be held harmless in the event of any suit, damages, or other legal action. Furthermore, I hereby release Unplugged Performance and any associated entities from any and all liability for any potential claim or claims.
If you do not agree with any of the above statements, you should return the product immediately. For more information please see our Terms and Conditions.
Before lifting the vehicle into the air, be sure to place the vehicle into jack mode to prevent over inflating your factory air suspension system. Then, using a vehicle lift, lift the vehicle.

Using a 21mm socket, remove all 4 wheels.

Identify the front factory height sensor assembly in the front wheel well as shown below. Note: Identify the orientation of the OEM height sensor bracket and sensor arms as you well reinstall the Unplugged Performance lowering bracket and sensor arms in the same orientation.
FRONT DRIVER FRONT PASS REAR PASS REAR DRIVER

Using a 10mm end wrench, remove the retainer nut securing the front factory height sensor assembly to the front upper control arm.

Once the nut has been removed, pull the threaded stud out and let it hang as shown below.

Unplug the cable assembly from the front height sensor assembly.


Using a 10mm socket, remove the bolt securing the factory front height sensor assembly to bracket to the vehicle. Remove the factory front height sensor assembly from the vehicle.


Using a T20 torx bit, remove both screws securing the front factory height sensor to the factory height sensor bracket. These factory screws will be reused to fasten the factory front height sensor.

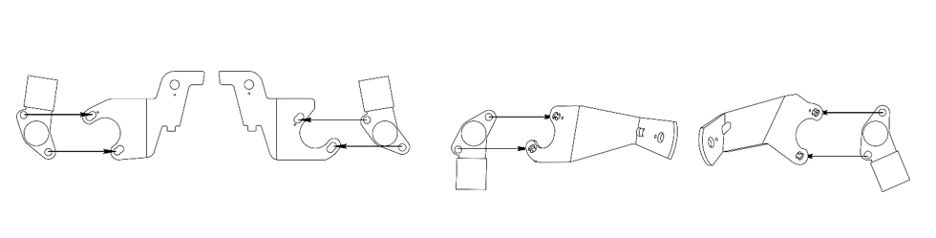
Identify the corresponding UP lowering bracket. Each UP bracket is marked according to the install location.

Using a T20 torx bit and the factory torx bolts, secure the front height sensor to the UP front height sensor bracket in the same orientation it was installed on the factory bracket. Torque to 4ft/lbs, or hand tight until both bolts are properly seated in the sensor.


Using a 10mm socket, secure the front UP height sensor bracket to the chassis. Torque to 12 ft/lbs.

Reconnect the cable assembly to the front height sensor assembly.

Using a 10mm end wrench, secure the height sensor assembly to the front upper control arm. Torque to 12ft/lbs.


Repeat steps 2-5 on the other side of the vehicle.
Identify the rear factory height sensor assembly in the rear wheel well as shown below.
 Unplug the cable assembly from the front height sensor assembly.

Using a 10mm end wrench, remove the retainer bolt securing the rear factory height sensor assembly to the rear upper toe arm.

Using a 10mm socket and extension, remove the retainer bolt securing the rear factory height sensor bracket to the chassis. Remove the rear height sensor assembly from the vehicle.


Using a T20 torx bit, remove both screws securing the rear factory height sensor to the factory height sensor bracket. These factory screws will be reused to fasten the factory front height sensor.

Identify the corresponding UP lowering bracket. Each UP bracket is marked according to the install location.
Using a T20 torx bit and the factory torx bolts, secure the front height sensor to the UP front height sensor bracket in the same orientation it was installed on the factory bracket. Torque to 4ft/lbs, or hand tight until both bolts are properly seated in the sensor.


Using a 10mm socket, secure the rear UP height sensor bracket to the chassis. Torque to 12 ft/lbs.


Using a 10mm end wrench, secure the rear UP height sensor bracket to the traction arm. Torque to 12 ft/lbs.

Reconnect the cable assembly to the rear height sensor assembly.

Repeat steps 6-8 on the other side of the vehicle.
Congratulations, your Sports Dynamic Air Suspension Lowering Kit is complete!