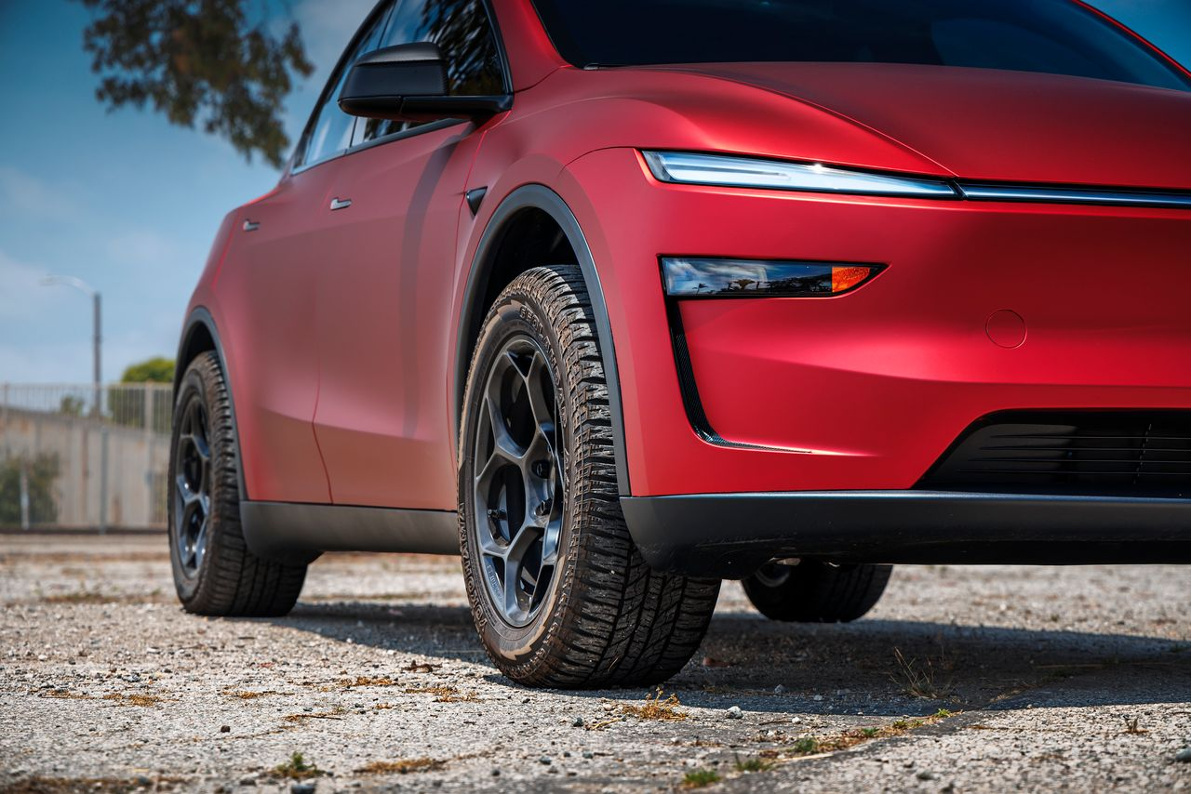
My Account My Account
Menu
Leveling Lift Kit

Tesla Model Y
Leveling Lift Kit
INSTALLATION GUIDE

  • Parts List
  • Tool List
  • Torque Specs
  • Release of liability and product warranty
  • 01 Step 1: Lift the Vehicle
  • 02 Step 2: Remove Front Shocks
  • 03 Step 3: Install Front Leveling Lift Kit
  • 04 Step 4: Remove Rear Shocks and Springs
  • 05 Step 5: Install Rear Leveling Kit
  • 06 Step 6: Installation Complete
Parts List
  • UP Stud Extenders (x6)
  • Front Spring Shim (x2)
  • Rear Spring Shim (x2)
  • Rear Spring isolator (x2)
  • Rear Shock Shim (x4)
Tool List
  • Vehicle lift
  • Pry tool
  • Ratchet
  • Torque wrench
  • 6mm socket
  • 10mm socket
  • 13mm socket
  • 15mm socket
  • 18mm socket
  • 21mm socket
  • 21mm end wrench
  • T50 torx bit
Torque Specs
  • Please see individual steps for torque specs.
Release of liability and product warranty

By installing or using this product, you understand and agree with the following: If you do not agree, do not proceed with the installation and return this product within 30 days for a full refund of the purchase price from the company from which you have purchased it.

  • I understand and agree that this product is intended to be installed for use on private roads and in jurisdictions where the use of this product is deemed legal by the local authorities. Furthermore, I understand and agree Unplugged Performance does not have any knowledge or control of regulations in my local jurisdiction, and it is up to me to determine if the product is acceptable for use with my vehicle.
  • I understand that Unplugged Performance has done testing of this product on road and on closed racetracks but does not have the ability to test the vehicle for localized standards and regulations.
  • I understand and agree that if the vehicle manufacturer determines that any Unplugged Performance products have contributed to a problem with the vehicle it may affect the vehicle’s warranty. Furthermore, I understand and agree that Unplugged Performance has no duty nor ability to be involved in internal manufacturer decisions.
  • I understand and agree that if this product is given to an installer for installation on my vehicle, I have read and agreed with all the previous, even if I am not personally installing these parts on my vehicle. Furthermore, I understand and agree that this product should be installed by a trained professional that is familiar with both the vehicle as well as this product. Furthermore, I understand and agree that I and/or my chosen installer will follow the installation instructions carefully and dutifully test the vehicle post-installation in a safe and controlled environment to ensure proper operation.
  • I understand and agree that by installing this product Unplugged Performance and all associated persons and entities as well as the vehicle manufacturer and all associated entities must be held harmless in the event of any suit, damages, or other legal action. Furthermore, I hereby release Unplugged Performance and any associated entities from any and all liability for any potential claim or claims.

If you do not agree with any of the above statements, you should return the product immediately. For more information please see our Terms and Conditions

01 Step 1: Lift the Vehicle

Start by safely lifting the vehicle on either a 4-point lift, or using floor jacks with jack stands.

02 Step 2: Remove Front Shocks

Using a 21mm socket, remove the front wheels to access the front suspension.

Tesla-Model-Y-Leveling-Lift-Kit-step-3

Next, open the hood, and swiftly pull the upper plastic cowling away from the vehicle.

Tesla-Model-Y-Leveling-Lift-Kit-step-4

Using a pry tool, remove the exposed air duct as shown below.

Tesla-Model-Y-Leveling-Lift-Kit-step-5

Using a pry tool, remove the frunk light assembly. Be careful not to damage the power cable when disconnecting the socket.

Tesla-Model-Y-Leveling-Lift-Kit-step-6

Using a 10mm socket, remove the bolts securing the front tub assembly to the vehicle, and remove the tub from the vehicle. Note that some tubs may have a push clip securing the windshield wiper fluid funnel to the frunk as opposed to a 10mm bolt.

Tesla-Model-Y-Leveling-Lift-Kit-step-7

Using a pry tool, remove the shock tower flap covers on either side of the vehicle.

Tesla-Model-Y-Leveling-Lift-Kit-step-8

Using a pry tool, remove the wheel speed sensor cable assembly from the upright, as well as the front upper control arm assembly.

Tesla-Model-Y-Leveling-Lift-Kit-step-9

Using a 10mm socket, remove the brake line bracket from the upright.

Tesla-Model-Y-Leveling-Lift-Kit-step-10
Using an 18mm socket, remove the lock nut securing the sway bar endlink to the front shock fork, and remove the endlink from the fork.

Tesla-Model-Y-Leveling-Lift-Kit-step-11

Using a T50 and a 15mm socket, remove the pinch bolt and nut securing the front upper control arm drop pin to the upright.

Tesla-Model-Y-Leveling-Lift-Kit-step-12

Using a 21mm socket, and a 21mm end wrench, remove the bolt and nut securing the lower shock fork to the front lower lateral control arm.

Tesla-Model-Y-Leveling-Lift-Kit-step-13

Using a 13mm socket, remove the following 2 bolts securing the front upper control arm cradle assembly to the vehicle. (Note that some Model Y vehicles may have different front subframe assembly that does not utilize a front upper control arm cradle. If this is the case, proceed to remove the same 13mm bolts accordingly.)

Using a 15mm socket, remove the following 2 bolts securing the front upper control arm cradle assembly to the vehicle. Be sure to hold the shock while removing the final bolt as it is no longer fastened to the vehicle, and will likely fall from the vehicle once the threads are no longer engaged. (Note that some Model Y vehicles may have different front subframe assembly that does not utilize a front upper control arm cradle. If this is the case, proceed to remove the same 13mm bolts accordingly.)

Tesla-Model-Y-Leveling-Lift-Kit-step-15

Once the front shock and front upper control arm cradle assembly has been removed from the vehicle, using a 13mm socket, remove the 3 nuts securing the front upper control arm cradle assembly to the front tophat assembly.

Tesla-Model-Y-Leveling-Lift-Kit-step-16

Repeat Step 2 for the other side of the vehicle.

03 Step 3: Install Front Leveling Lift Kit

Once the front shock assembly has been removed from the vehicle and disconnected from the cradle assembly, you can proceed to install the front leveling lift kit onto the vehicle shock mount. Using a 6mm socket and medium strength thread locker, secure 1 stud extender onto each tophat stud (3 per tophat).

Tesla-Model-Y-Leveling-Lift-Kit-by-Unplugged-Performance step 18

Before applying final torque, guide the lift spacer onto the studs as shown below.

Tesla-Model-Y-Leveling-Lift-Kit-by-Unplugged-Performance
Using a 6mm socket and a torque wrench, torque to 17ft/lbs.

Tesla-Model-Y-Leveling-Lift-Kit-step-19

Using a 13mm socket, fasten the factory nuts to secure the factory cradle assembly to the leveling lift kit.

Tesla-Model-Y-Leveling-Lift-Kit-step-20

Using a 13mm socket and torque wrench, torque to 17ft/lbs.

Tesla-Model-Y-Leveling-Lift-Kit-step-21
Using both factory 13mm bolts, lift the front strut assembly and secure it to the vehicle.

Tesla-Model-Y-Leveling-Lift-Kit-step-22
Using a 13mm socket and torque wrench, torque both bolts to 25ft/lbs.

Tesla-Model-Y-Leveling-Lift-Kit-step-23

Using both factory 15mm bolts, fasten the front strut assembly to the vehicle.

Tesla-Model-Y-Leveling-Lift-Kit-step-24
Using a 15mm socket and torque wrench, torque both bolts to 45ft/lbs.

Tesla-Model-Y-Leveling-Lift-Kit-step-25
Using a T50 Torx socket, and a 15mm socket, fasten the factory pinch bolt and nut to secure the front upper control arm drop pin to the factory upright.

Tesla-Model-Y-Leveling-Lift-Kit-step-26
Using a T50 Torx socket, a torque wrench, and a 15mm socket, torque the factory pinch bolt and nut to 41ft/lbs.

Tesla-Model-Y-Leveling-Lift-Kit-step-27
Using a 21mm socket and end wrench, fasten the factory bolt and nut to secure the shock fork to the front lower control arm. Consider using a jack to lift the knuckle in order to align the fork mount with the control arm.

Tesla-Model-Y-Leveling-Lift-Kit-step-28
Using a 21mm socket, a torque wrench, and a 21mm end wrench, torque the 21mm nut and bolt to 78ft/lbs.

Tesla-Model-Y-Leveling-Lift-Kit-step-29
Using an 18mm socket, fasten the factory nut to secure the shock to the endlink.

Tesla-Model-Y-Leveling-Lift-Kit-step-30
Using an 18mm socket and a torque wrench, torque to 72ft/lbs.

Tesla-Model-Y-Leveling-Lift-Kit-step-31
Using a 10mm socket, fasten the factory bolt to secure the brake line to the upright.

Tesla-Model-Y-Leveling-Lift-Kit-step-32
Using a 10mm socket and a torque wrench, torque to 6ft/lbs.

Tesla-Model-Y-Leveling-Lift-Kit-step-33
Resecure the wheel speed sensor assembly to the factory upright and front upper control arm assembly.

Tesla-Model-Y-Leveling-Lift-Kit-step-34
Repeat Step 3 for the other side of the vehicle.

04 Step 4: Remove Rear Shocks and Springs

Using a 21mm socket, remove the rear wheels from the vehicle.

Tesla-Model-Y-Leveling-Lift-Kit-step-37
Using a 10mm socket, remove the rear spring arm covers. (It may also be helpful to remove the rear under tray as well to increase clearance for the rear spring removal.)

Tesla-Model-Y-Leveling-Lift-Kit-step-38
Using a transmission jack (or floor jack if applicable), support the rear lower spring arm to ensure any loaded pressure can be supported in a controlled fashion.

Tesla-Model-Y-Leveling-Lift-Kit-step-39
Using a 21mm socket, and a 21mm end wrench, remove the bolt and nut securing the lower shock mount to the rear lower spring arm.

Tesla-Model-Y-Leveling-Lift-Kit-step-40
Using a 21mm socket, and a 21mm end wrench, remove the bolt and nut securing the rear knuckle to the rear lower spring arm.

Tesla-Model-Y-Leveling-Lift-Kit-step-41
With both 21mm bolts and nuts removed from the rear spring arm, slowly release pressure from the transmission jack to allow the spring arm to droop underneath the vehicle.

Tesla-Model-Y-Leveling-Lift-Kit-step-42
Using a 15mm socket, remove the 2 bolts securing the rear tophat to the vehicle chassis. Be sure to carefully hold the shock with one hand when removing the second bolt as the shock may fall away from the vehicle.

Tesla-Model-Y-Leveling-Lift-Kit-step-43Tesla-Model-Y-Leveling-Lift-Kit-step-43
With the Rear shock removed, you now have adequate clearance to remove the rear spring. Press the rear spring arm downward and pull the rear spring assembly away from the vehicle.

Tesla-Model-Y-Leveling-Lift-Kit-step-44
Repeat step 4 on the other side of the vehicle.

05 Step 5: Install Rear Leveling Kit

Now that the rear shock and spring are removed, proceed to assemble the rear leveling kit onto the rear shock and spring as shown below. Place the rear spring spacer and isolator above the rear spring as shown below.

Tesla-Model-Y-Leveling-Lift-Kit-step-46
Install the spring, spring spacer, and spring isolator into the spring arm by pulling the spring arm down, similar to the spring removal process.

Tesla-Model-Y-Leveling-Lift-Kit-step-47
Replace the factory 15mm bolts on the rear shock tophat with the provided 15mm bolts.

Tesla-Model-Y-Leveling-Lift-Kit-step-48
Place a lift spacer onto each provided 15mm bolt and Transfer the factory bolt retainers from the factory bolts to the provided bolts.

Tesla-Model-Y-Leveling-Lift-Kit-step-49
Using a 15mm socket, fasten both bolts to secure the rear shock tophat and leveling kit to the vehicle.

Tesla-Model-Y-Leveling-Lift-Kit-step-50
Using a 15mm socket and a torque wrench, torque the bolts to 30 ft/lbs.

Tesla-Model-Y-Leveling-Lift-Kit-step-51
Using a transmission jack (or floor jack), lift the rear spring arm to align with the rear knuckle.

Tesla-Model-Y-Leveling-Lift-Kit-step-52

Using a 21mm socket and endwrench, fasten the factory bolt and nut to secure the rear spring arm to the rear shock mount.

Tesla-Model-Y-Leveling-Lift-Kit-step-53
Using a 21mm socket and endwrench, fasten the factory bolt and nut to secure the rear spring arm to the rear knuckle.

Tesla-Model-Y-Leveling-Lift-Kit-step-54
Using a 21mm socket, 21mm endwrench, and a torque wrench, torque 21mm knuckle bolt and nut to 85 ft/lbs.

Tesla-Model-Y-Leveling-Lift-Kit-step-55
Using a 21mm socket, 21mm endwrench, and a torque wrench, torque 21mm shock mount bolt and nut to 85 ft/lbs.

Tesla-Model-Y-Leveling-Lift-Kit-step-56

Slowly release the transmission jack and move it away from the vehicle.

Tesla-Model-Y-Leveling-Lift-Kit-step-57

Repeat step 5 on the other side of the vehicle.

06 Step 6: Installation Complete

With the leveling lift kit installation complete, it is now time to reinstall the front tub assembly, rear spring arm covers, rear under tray, and wheels in the same orientation they were removed from the vehicle.

We highly recommend following this installation with a vehicle alignment for an optimal driving experience.

Model Y Leveling Lift Kit Install


Unplugged Performance Reviews Section Footer Background Image

WHAT OUR CUSTOMERS SAY

RATED 4.97 Rating Star Rating Star Rating Star Rating Star Rating Star (368 REVIEWS)
LEAVE A REVIEW

With real reviews from real customers, shop UP products for your Tesla Model S, 3, X, Y and Cybertruck with confidence. Leave reviews and earn up to 2000 UP Rewards points each, redeemable towards exclusive UP Products.

Tesla Model Y UP Forged UP-RW Road Warrior Wheel (Set of 4)
RATED 5.0
Rating Star Rating Star Rating Star Rating Star Rating Star
Tesla Model Y UP Forged UP-RW Road Warrior Wheel (Set of 4)
These wheels deliver. I've been looking for wheels that look good and can maintain efficiency. These wheels hit both marks and have the added bonus of durability.
Cory O. September 30, 2025
Tesla Cybertruck Heavy Duty Rear Bumper with Hardcore Trailer Hitch Receiver - UP INVINCIBLE®
RATED 5.0
Rating Star Rating Star Rating Star Rating Star Rating Star
Tesla Cybertruck Heavy Duty Rear Bumper with Hardcore Trailer Hitch Receiver - UP INVINCIBLE®
I'm currently putting together my custom UP INVINCIBLE® kit from Unplugged Performance with the help of Frank, and the transformation is insane. The lineup includes the HD Front Bumper with the optional 11-inch LED light bar that absolutely lights up the night, the bulletproof Heavy Duty Rear...
CyberRiri December 03, 2025
2024+ Tesla Model 3 Adjustable Front and Rear Sway Bar Set
RATED 5.0
Rating Star Rating Star Rating Star Rating Star Rating Star
2024+ Tesla Model 3 Adjustable Front and Rear Sway Bar Set
The sway bars are phenomenal. I installed these in my 2025 model 3 performance. I already had the moderate lowering springs from unplugged and after adding the sway bars and the end links made a massive difference. There's barely any body roll and the car feels more planted even when heavy...
mauricio p. April 27, 2025
Tesla Model 3 / Performance - Dual Rate Linear Lowering Springs Set
RATED 5.0
Rating Star Rating Star Rating Star Rating Star Rating Star
Tesla Model 3 / Performance - Dual Rate Linear Lowering Springs Set
My 2022 3 Performance was a monster truck in stock form, wasn't pleased with the look or the softness. A car of this caliber shouldn't look this way and thank goodness Unplugged had the fix. I got their Moderate Springs and they are the perfect amount of drop to daily the car. They eliminate the...
850arrrsaylikepirate December 19, 2022
Tesla Model 3 Adjustable Front and Rear Sway Bar Set
RATED 5.0
Rating Star Rating Star Rating Star Rating Star Rating Star
Tesla Model 3 Adjustable Front and Rear Sway Bar Set
Best modification I ever did to the Tesla combined it with H&R lowering springs pears very well to fix the suspension quality that is given in stock. Easy Job doesn’t take more than 2 hours.
Pat M. October 09, 2025
Tesla Model 3 Billet Adjustable Rear Camber Arm Set
RATED 5.0
Rating Star Rating Star Rating Star Rating Star Rating Star
Tesla Model 3 Billet Adjustable Rear Camber Arm Set
Coupled with the FUCAs, the rear arms really help do a proper alignment. Definitely get these if you want to get a perfect alignment for your car, and better than OEM. I put -2 camber in the rear for my track day yesterday and achieved phenomenal handling in the corners. I also tried it out in drift...
Sof October 18, 2022
Tesla Model 3 Billet Adjustable Rear Camber Arm Set
RATED 5.0
Rating Star Rating Star Rating Star Rating Star Rating Star
Tesla Model 3 Billet Adjustable Rear Camber Arm Set
Really fixed my rear alignment problems. Lowered my car without it and had some slightly uneven tire wear. With 2 track days I even got 24,000 miles out of a single set of tires with perfectly even wear. This set will save you on tires after just one set, total no brainer for the price! Love being...
zackfeldstein9 September 24, 2022
Tesla Model 3 Alcantara Headliner Kit
RATED 5.0
Rating Star Rating Star Rating Star Rating Star Rating Star
Tesla Model 3 Alcantara Headliner Kit
I got this installed about 2 years ago and everything is perfect! This really makes my car's interior complete instead of having a plastic headliner. Every time another Model 3 owner looks inside my car, that is definitely the first thing they noticed. Also the guys who worked on my car were super...
aranetasteven December 15, 2022
Tesla Model S, 3, X, Y - UP-03 Super Lightweight Forged Wheel Package
RATED 5.0
Rating Star Rating Star Rating Star Rating Star Rating Star
Tesla Model S, 3, X, Y - UP-03 Super Lightweight Forged Wheel Package
The UP-03 lightweight & strong wheels are by far THE best wheels I have purchased for my Teslas. These wheels are installed on my Model 3, Y & X. These wheels not only turn heads but also improve efficiency and noticeable difference in speed due to their light weight characteristics. These wheels...
f1dinesh August 12, 2023
UP Pikes Peak Race Team T-Shirt
RATED 5.0
Rating Star Rating Star Rating Star Rating Star Rating Star
UP Pikes Peak Race Team T-Shirt
These shirt feel amazing. Light and breathable. They fit well around the arms and chest. Cool print design. The shipping was really quick and amazing service! Kudos to Andrew for providing an over the top customer service with much excellence.
joydadulla September 29, 2022
Unplugged Performance Newsletter
Subscribe to our Newsletter
Sign up to get the latest updates on UP Products, news, galleries and offers!
Please select all Tesla models you are interested in:
FEATURED IN
TeslaRati Logo 1
Automobile Magazine Logo 1
MotorTrend Logo 1
AutoBlog Logo 1
TopGear Logo 1
Car and Driver Logo 1
Road and Track Logo 1
The Drive Logo 1
AutoWeek Logo 1
The Joe Rogan Experience Logo 1
Unplugged Performance is the world leader in premium performance upgrades for Tesla vehicles. With our USA-made line of stylish and high-performance parts, our sole focus is on holistic development and improvement of all Tesla cars.
Unplugged Performance was founded and incubated by the team behind the world-renowned automotive customizer Bulletproof Automotive. Unplugged Performance is the world's leading company focused on the customization and sports performance of Tesla Motors vehicles.
All of our parts are researched and engineered on our own development vehicles with the intention of improving every aspect of the driving and ownership experience. Unplugged produces an exclusive range of premium upgrades to give a new sporty performance identity to Tesla Model S, Model X, Model 3, Model Y, and the Cybertruck.
Improving on perfection is no easy task, and to do so Unplugged products are professionally designed, prototyped, and manufactured in-house in Hawthorne, CA, and in collaboration with the best motorsports suppliers. The supercar performance of Tesla vehicles meets supercar-grade enhancements with Unplugged Performance.
Tesla Model X - Premium Aftermarket Upgrades And Wheels
Tesla Model Y - Premium Aftermarket Upgrades & Wheels
UP.Forged Wheels
GUARANTEED SAFE CHECKOUT WITH THESE PREMIUM PAYMENT OPTIONS
Payment Options - American Express, Discover, Visa, MasterCard, JCB, Maestro Credit Cards Payment Options - Apple Pay, PayPal, Splitit, Diners Club International, Union Pay Credit Cards
TESLA, TESLA MOTORS, and all related brands, marks and intellectual property including but not limited to TESLA ROADSTER, TESLA CYBERTRUCK, MODEL S, MODEL 3, MODEL X, MODEL Y, and the "TESLA," "T" logos designs are trademarks or registered trademarks of Tesla Motors, Inc. in the United States and other countries. Unplugged Performance has no official relationship with Tesla Motors.
THESE PRODUCTS CAN EXPOSE YOU TO CHEMICALS WHICH ARE KNOWN BY THE STATE OF CALIFORNIA TO CAUSE CANCER, OR BIRTH DEFECTS, OR OTHER REPRODUCTIVE HARM. FOR MORE INFORMATION PLEASE VISIT WWW.P65WARNINGS.CA.GOV
COPYRIGHT © 2026 UNPLUGGED PERFORMANCE®. ALL RIGHTS RESERVED.
THE UNPLUGGED PERFORMANCE® MARK AND LOGO ARE TRADEMARKS OF UNPLUGGED PERFORMANCE INC. ALL RIGHTS RESERVED. PLEASE REVIEW THE TERMS & CONDITIONS AND PRIVACY POLICY BEFORE USING OUR WEBSITE.
close