
RELEASE OF LIABILITY AND PRODUCT WARRANTY
This product carries a lifetime warranty against mechanical failure or corrosion. It can be exchanged for an identical item or a similar item as determined by Unplugged Performance. It may not be returned for cash and credit. There is no warranty regarding surface imperfections or aesthetic damage incurred during regular use, and/ or damage from an impact or other usual driving circumstance.
By installation or use of this product, you understand and agree with the following. If you do not agree, do not proceed with the installation, and return this product within 30 days for a full refund of the purchase price from the company from which you have purchased.
- I understand and agree that this product is intended to be installed for use on private roads and in jurisdictions where the use of this product is deemed legal by the local authorities. Furthermore, I understand and agree Unplugged Performance does not have any knowledge or control of regulations in my local jurisdictions and it is up to me to determine if the product is acceptable for use with my vehicle.
- I understand and agree that this product affects the ride height of the vehicle and may make the vehicle more susceptible to damage from road debris, dips, inclines, and other road hazards. Furthermore, I understand that ride height adjustment may make the vehicle perform differently in emergency scenarios or in the event of a vehicle crash and impact. Furthermore, I understand that Unplugged Performance has done testing of this product on road and on closed racetracks but does not have the ability to test the vehicle for localized standards and regulations.
- I understand and agree that lowering my vehicle will, in certain circumstances, require a different driving style and reduced speeds.
- I understand and agree that if the vehicle manufacturer determines that the lowered ride height contributed to a problem with the vehicle, and it may affect the vehicle’s warranty. Furthermore, I understand and agree that Unplugged Performance has no duty nor ability to be involved in internal manufacturer decisions.
- I understand and agree that if this product is given to an installer for installation on my vehicle, I have read and agreed with all the previous, even if I myself am not personally installing these parts on my vehicle. Furthermore, I understand and agree that this product should be installed by a trained professional that is familiar with both the vehicle as well as the product. Furthermore, I understand and agree that I and/ or my chosen installer will follow the installation instructions carefully and dutifully test the vehicle post-installation in a safe and controlled environment to ensure that it is operating properly.
- I understand and agree that by installing this product Unplugged Performance an all-associated persons and entities as well as the vehicle manufacturer and all associated entities must be held harmless in the event of any suit, damages, or other legal action. Furthermore, I hereby release Unplugged Performance and any associated entities and any associated entities from all liability for any potential claim or claims.
IF YOU DO NOT AGREE WITH ANY OF THE ABOVE STATEMENTS YOU SHOULD RETURN THE PRODUCT IMMEDIATELY. For more information visit: https://unpluggedperformance.com/terms-and-conditions/
PLEASE NOTE: THE REAR OF THE VEHICLE MUST BE LIFTED COMPLETELY OFF THE GROUND AND SHOULD REMAIN OFF THE GROUND UNTIL INSTALLATION IS COMPLETE.
LOWERING BRACKET IDENTIFIERS AND ORIENTATIONS

(2021 +) Model S and Model X
Please note: Before installation, be sure to have the proper tools and safety equipment. This installation requires a level surface for even height calibration across the vehicle.
CONTENTS LIST
- 10mm socket on a 10” extension (extension is not required but highly recommended)
- T20 torx bit
- Large set of pliers (for convenience)
- Safety equipment
- Floor jack or hydraulic lift, jack stands

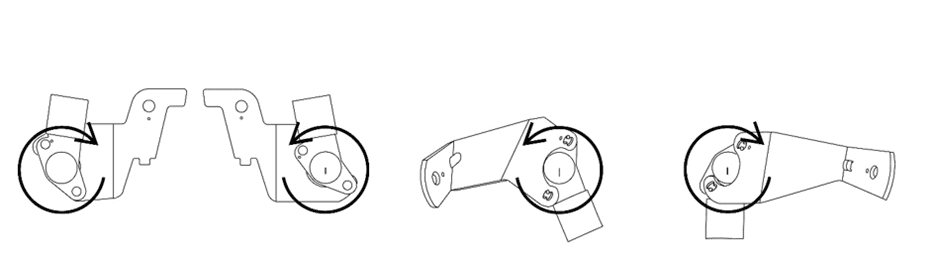
Please note: Before starting your installation lay out your brackets and validate the location and orientation of the brackets. Model S lowering brackets will show a dot, whereas Model X lowering brackets will not. Pictured above are the Model S lowering brackets with their representative markings.
OEM SENSOR AND BRACKET REMOVAL
- Once on a level surface, open the suspension settings on your screen to raise the car to its ‘very high’. Go to the service menu and put the car into jack mode. Then, lift the car into place. Without lowering the car, place a jack stand under the suspension knuckle on the corner of the vehicle. (Note: this is safety technique; Do not lower the vehicle onto the jack stand placed under the knuckle) While it is not necessary to remove the front wheels it is recommended, especially if this is your first time performing this installation.
- With the car in the air, wheel off, and jack stand in place, unplug the sensor and begin by removing the 10mm hex bolt. With the sensor and stock bracket loose, move into position and pull the sensor arm from the ball mount on the underside of the control arm. (Note: Be careful not to damage the sensor arms as external plastics exposed to the elements can become brittle over time)
- Once you have removed the sensor and bracket from the vehicle, use a T20 torx bit to remove the screws from the sensor assembly. (Note: Identify the orientation of the OEM height sensor bracket and sensor arms as you well reinstall the Unplugged Performance lowering bracket and sensor arms in the same orientation)
- Using the diagram below, note the front sensors are secured on the “front” of the lowering bracket and that the rear sensors are secured to the “back” of the bracket.

6. When installing the sensor on the UP bracket make sure to choose the desired setting. Position 1 is marked with a dot; this is the lower of the two settings.
7. Place the sensor on the bracket and begin to tighten the screws as you finish tightening make sure to push the sensor in the direction of the dot. Check the diagram for the correct rotation direction.
Note: Follow these same instructions if you ever decide to go back to stock. Otherwise, you may get a very slight variation in heights.
BRACKET TO VEHICLE INSTALLATION
- Once tightened down, take your assembly to the car and place the lower locating pin of the bracket into the hole in the body of your model S, once in place rotate the bracket and make sure the hook on the bracket catches the body of the car securing it into place. Hand tighten your 10mm bolt back in its place. As you tighten it use your other hand to push the assembly so that the hook is being pressed against the body of the car (this is to ensure the correct placement of the sensor)
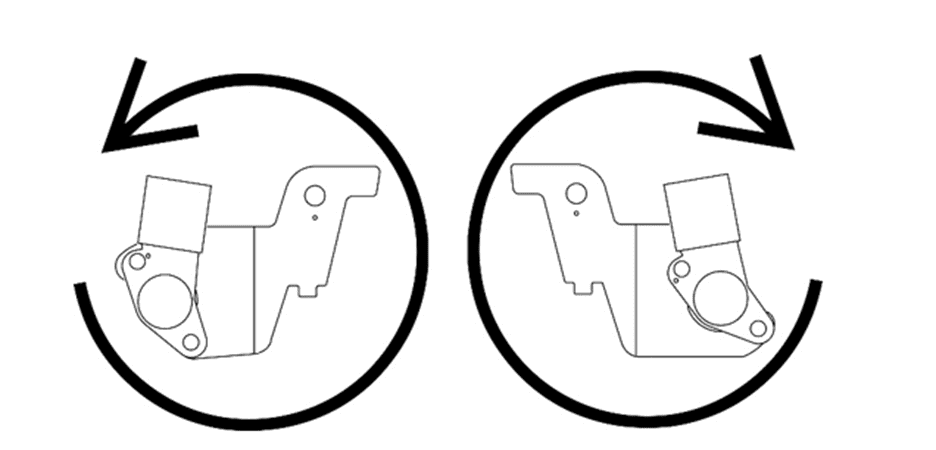
- Now it’s time to get your sensor socket back on the ball. To do this, place the sensor arm socket over the ball. With your 10mm socket and extension give the ball end a hard push and it will pop back on.
- Plug in your sensor, re-mount your wheels, and use these same steps on the opposite side of the front of your model S.
Rear bracket installation
Please note: For the rears, it is necessary to remove the wheel so jack your car up and place your jack stand, and ensure you are safe to continue.
- Unplug the sensor and begin by removing the 10mm hex bolt. With the sensor and stock bracket loose, move into position and pull the sensor arm from the ball mount on the underside of the control arm.
- Once you have the sensor and bracket off the car use your t20 Torx to remove the screws from the assembly, remember the orientation and replace them with the Unplugged Performance lowering bracket.
- When installing the sensor on the UP bracket make sure to choose the desired setting. Position 1 is marked with a dot; this is the lower of the two settings and recommended.
- Place the sensor on the bracket and begin to tighten the screws as you finish tightening make sure to push the sensor in the direction of the dot.
(Follow these same instructions if you ever decide to go back to stock or you may get a very slight deviation in heights.)
- Once tightened down, take your assembly to the car and place the locating pin of the bracket into the hole in the body of your model S, once in, tighten your 10mm bolt.
- Now it’s time to get your sensor socket back on the ball. To do this, Place the sensor arm socket over the ball. You may use two hands to push it in, otherwise, grab a towel to avoid damage and a set of pliers and tighten down until you hear the pop.
- Plug in your sensor, on your wheel, and use these same steps on the opposite side of the rear of your Model S.
- Lower your car and remember to torque your lug nuts to 129 ft/lbs. Turn off jack mode and lower your car. Cycle through the settings a few times and drive the car around the block, the car should quickly settle into its new stance.
- We recommend you place the car’s suspension into sport mode to make sure the car reacts best to the new lowered setting.
Internal Height Troubleshooting
After the installation is complete, if your vehicle is not lowering as expected, we recommend a soft reset of the computer on a level surface. The vehicle may take upwards of 10 minutes to turn back on fully, but this should help the car recalibrate to the new brackets. If your car has dropped properly but is providing a height error code internally, you can check the perceived heights within the onscreen menu of the vehicle. This is found under the suspension category. If you find the internal perceived heights to be off, then you can make some micro adjustments to correct this variance. Changing the perceived heights, will not affect the external heights.
Example of internal height variance found on the infotainment system:
-4 LF
-16 RF
-16 LR
-4 RR
Given the example of internal height values, you will follow the same concepts found below to correct your variances. The variances themselves are measured in 0.4 degree increments.
You will start by adjusting bracket angles to even out the perceived heights before touching the sensors themselves. You’ll also start by adjusting only the front brackets as once the fronts are leveled, then the rears are as well.
Although the RF perceived value is -16, eluding to a lower height, it’s actually reading as higher in that corner. Therefore, your approach in this case would be to clock the bracket toward the back of the vehicle on the Right front corner.
Front Bracket Adjustments:
To raise the car, you clock the bracket toward the front of the vehicle.
To lower the car, you clock the bracket toward to the rear of the vehicle.
You will accomplish this by loosening the 10mm nut and clocking the bracket within the tolerance of the vehicle slots. We recommend holding pressing the bracket in the intended direction while you tighten the 10mm bolt to ensure the bracket does not move while you tighten it. The height s3ensors are very sensitive, and these small adjustments do drastically affect perceived heights.
Typically, correcting the fronts perceived heights will correct the rear perceived height variances as well.
If you need more adjustment in the rear, you work with the sensors themselves, not the brackets. The adjustments to the rear brackets are similar to camber angle. You will want to adjust the sensor inward or outward on the vehicle.
Revised 7/22/22