RELEASE OF LIABILITY AND PRODUCT WARRANTY
By installation or use of this product, you understand and agree with the following. If you do not agree, do not proceed with installation, and return this product within 30 days This product carries a lifetime warranty against mechanical failure or corrosion. It can be exchanged for an identical item, or a similar item as determined by Unplugged Performance. It may not be returned for cash or credit. There is no warranty regarding surface imperfections or aesthetic damage incurred during regular use, and/ or damage from an impact or other usual driving circumstance.
PLEASE ADVISE: THIS PRODUCT MAY NOT QUALIFY FOR LEGAL USE BASED ON YOUR LOCAL LAWS. BE SURE TO CONFIRM WITH YOUR LOCAL JURISDICTION PRIOR TO PURCHASE. WE DO NOT RECOMMEND ANY HEAVY USAGE OF THIS PRODUCT SUCH AS TRACK USAGE OR REPEATED STOPS FROM EXTREEMLY HIGH SPEEDS WITHOUT ADDITIONAL SUPPORTING MODIFICATIONS BRAKE COOLING AND SAFETY EQUIPMENT. IF YOU ARE NOT 100% CONFIDENT IN YOUR ABILITY TO COMPLETE THE FOLLOWING STEPS BELOW, CONSULT YOUR LOCAL BRAKE SPECIALISTS FOR SUPPORT.
- I understand and agree that this product is intended to be installed for use on private roads and in jurisdictions where the use of this product is deemed legal by the local authorities. Furthermore, I understand and agree Unplugged Performance does not have any knowledge or control of regulations in my local jurisdictions and it is up to me to determine if the product is acceptable for use with my vehicle.
- I understand and agree that if this product is given to an installer for installation on my vehicle, I have read and agreed with all the previous, even if I myself am not personally installing these parts on my vehicle. Furthermore, I understand and agree that this product should be installed by a trained professional that is familiar with both the vehicle as well as the product. Furthermore, I understand and agree that I and/ or my chosen installer will follow the installation instructions carefully and dutifully test the vehicle post-installation in a safe and controlled environment to ensure that it is operating properly.
- I understand and agree that by installing this product, Unplugged Performance and all-associated persons and entities, as well as the vehicle manufacturer and all associated entities must be held harmless in the event of any suit, damages, or other legal action. Furthermore, I hereby release Unplugged Performance and any associated entities and any associated entities from all liability for any potential claim or claims.
IF YOU DO NOT AGREE WITH ANY OF THE ABOVE STATEMENTS YOU SHOULD RETURN THE PRODUCT IMMEDIATELY. For more information please see our Terms and Conditions.
CONTENTS LIST:
- X2 Front 6 Piston Calipers
- X2 Front CCM Rotors
- X2 Front Caliper Brackets
- X2 Front Brake-Lines
- X2 Rear Brake-Lines
- X4 Caliper to Bracket Bolts
- X4 Bracket to Knuckle Bolts
- X4 Banjo Bolts
- X8 Washers
Please Note: High-temperature brake fluid is not included in the kit due to hazardous shipping regulations, but it is REQUIRED for proper installation and safe operation. Motul RBF 660, PFC RH 665, Endless RF 650, Castrol SRF, or similar racing brake fluids are required.

TOOL LIST: 10mm Socket, 14mm Socket, 21mm Socket, 10mm Allen, 12mm Allen, 12mm Flare Nut Wrench, 14mm Wrench, Needle Nose Pliers, Ratchets, Impact Gun
The subject car must be cold prior to install
REMOVE THE OEM BRAKE HOSE

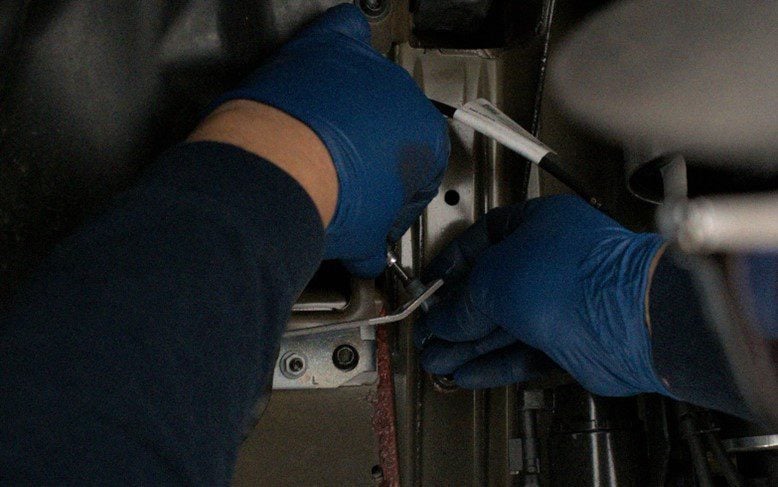
Begin by using a 12mm line wrench to loosen and remove the nut shown, this will leak brake fluid so please ensure you have protected yourself and your workspace. Next, remove the clip that holds the OEM hose to the bracket by sliding it outwards using a pair of needle-nose pliers. Some brake fluid will likely spill when disconnecting this line, so in order to minimize your cleanup, we recommend either placing a cap on the open line to the reservoir (as shown above) or placing a catch pan underneath the wheel well during the install.

Next, remove the 10mm bolt that holds the bracket as shown.

Now you will remove the final 10mm bolt located directly behind the rotor. There is no need to remove the OEM hose from the caliper as we will be removing the entire caliper next.
REMOVE THE OEM CALIPER AND ROTOR

Now, you’ll remove both 21mm bolts that secure the caliper to the knuckle. Please note that the rotor will also be loose at this point, it can be secured by putting on a lug nut hand tight. Pull the caliper outward away from the rotor and place aside. Now the rotor can be taken off freely, remove and place aside.
INSTALL UP CALIPER BRACKET


Begin by cutting the OEM shield as shown, this can be easily done with a pair of tin snips. Once yours looks like the picture above we can install the brackets.

Now you’ll install the caliper bracket. The bracket is intended to create more clearance for the larger rotors and calipers. When fitting the bracket to the knuckle, the bracket may not sit flush due to excess flashing material on the knuckle. Be sure to evenly tighten the top and bottom bolts (highlighted in the photo above) to secure the caliper bracket. You’ll want to torque bolts to 135nm or 99ftlbs. The flashing will compress while torquing the bracket down to allow for optimal fitment.
INSTALL UP STAINLESS-STEEL BRAKE HOSE

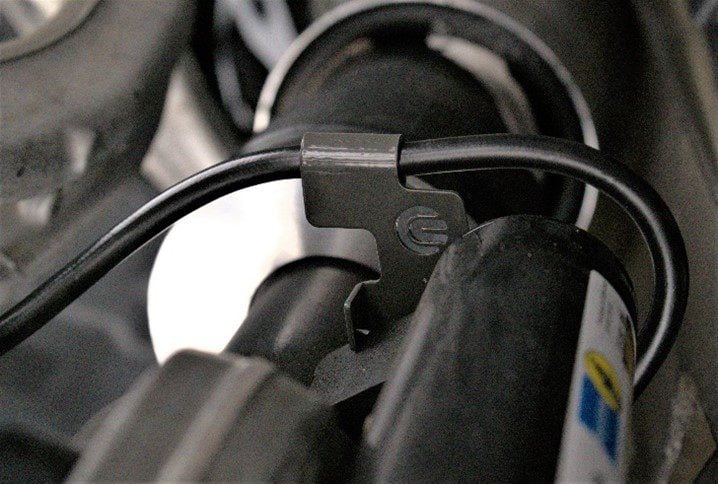

Install UP hose in the same order as the OEM brake-line was removed. The UP brake-line brackets are already assembled on the lines in the proper orientation for install, so be sure to confirm you have the correct line in via test fit prior to completing the following steps. The 10mm bolts bolding the brake-line brackets in place should be torqued to 6nm or 4ftlbs. Once the line has been reinstalled, guide the end through the bracket as shown above, and let it rest there for now.
INSTALL UP CALIPER AND CARBON-CERAMIC ROTOR
This process will be much easier with a second set of hands. First, begin by bringing the caliper close to the brake hose so that it can be installed using the supplied banjo bolts. Ensure that there is a washer on either side of the brake hose when installing the banjo bolt for a proper seal.
DO NOT INSTALL THE CALIPER WITHOUT FIRST INSTALLING THE BRAKE HOSE HAND TIGHT.
Next, you will slide your rotor into the corresponding caliper as it will sit on the vehicle. The rotor must be inserted caliper prior to mounting. This will create enough room within the wheel well for installation. Once the caliper and rotor are positioned correctly, you will mount the rotor onto the wheel studs while holding the caliper in place. Mounting both the rotor and caliper MUST be done in unison in order to complete the install.


Once the caliper and rotor are in position, you will use the long 12mm allen bolts (60mm in length) to secure the caliper to the bracket. These bolts sit behind the caliper as shown in the photo directly above. Tighten these allen bolts to 135nm or 99ftlbs. Now, using a 14mm wrench, you can secure the banjo bolt at the end of the brake-line.
ENSURE THAT THE OEM SHIELDING DOES NOT MAKE CONTACT WITH THE ROTOR! IF IT DOES, SIMPLY BEND IT AWAY FROM THE ROTOR BY PUSHING THE SHIELDING TOWARD THE INTERIOR CAR.
ONCE THE INSTALL IS COMPLETE PERFORM A FULL BRAKE BLEED WITH HIGH TEMPERATURE RACING BRAKE FLUID.
Congratulations! Once you complete your brake bleed with new high-temp fluid, you are ready to start using your new brake kit. Be sure to properly bed the brakes for optimal performance.
The bedding procedure that we recommend for proper pad transfer is as follows:
- First, perform a few gentle stops from 20-30 mph in an open area without traffic. Ensure that the brakes are functioning and the pedal pressure feels normal.
- Next, perform multiple (5 to 8) successive hard stops in an open area without traffic (use 80-90% percent pedal pressure, do not engage ABS) from highway speed down to low speed (for example from 60mph to 10mph). If this was performed correctly the brakes should be very hot and smelly and there should be a visible transfer layer of the pad onto the rotor. Due to the weight of the vehicle, the number of stops and the required speed needed for proper bedding is less than on many lighter weight sports cars with CCM brakes (Ferrari, Porsche, etc). Going significantly faster or doing significantly more stops for during the bedding procedure is not recommended.
- Allow brakes to cool back to a normal driving temperature and ensure that stopping is smooth and predictable.
If you have any issues slowing your vehicle after the install, or if the pedal does not produce a solid feel, stop driving immediately and tow your car to a brake specialist for further support.
If you have any questions about installation or operation, please contact our support team promptly at support@unpluggedperformance.com and do not take any action prior to hearing from us. Your safety is our overriding priority.