

PLEASE NOTE:
Prior to painting the U.P. Ascension Front Fascia, make sure to test fit it to your vehicle, as well as properly clean / degrease the piece to remove any latent contamination from production or handling. We recommend that for vinyl-wrapped applications, these parts, as well as the Fascia should be prepped in a similar fashion to paint to ensure a smooth wrap-ready surface. In the event that, for cost or time savings, the customer desires to wrap the bumper without first painting, please take extreme caution and understand that an improperly prepped part may show small imperfections through the wrap.
Do not heat in curing process. We strongly recommend curing parts at room temperature.
If you are experiencing a fitment issue, our necessary procedures include using the proper supplies in fabricating corrections with Urethane adhesives.
Please ensure consistent paint thickness on and around the tow loop cover. If paint build-up occurs, it may impact the fitment of the cover into the Fascia.
If the bumper arrives with any distortions: Please place it on flat ground and in direct sunlight. The sun’s natural heat will straighten out the bumper as the bumper has memory retention for shape.
Cutting or Modifying the bumper: Should you feel the fascia requires any modification to fit, including test-fitting trimming, clearancing, notching, shaping, contouring, blocking, block-sanding, sanding, feathering, grinding, filing, scribing, drilling, re-drilling, slotting, elongating, shimming, bracket adjustments, aligning, centering, gapping, filling, skim-coating, heat-forming, reshaping, or any other modifications, please do not proceed without first contacting support@unpluggedperformance.com as modification to the bumper may cause irreversible problems. Should adjustments be required to optomize fitment of the fascia on your vehicle, this should be done before the fascia is primered and painted or wrapped. This is a standard process and should be executed by a professional shop.
A Note On Thickness: All Ascension bumpers are intentionally adjusted for thickness in the highly sensitive area where the autopilot radar is located behind the bumper. This area is intentionally thinner to allow for adequate paint thickness without autopilot radar interference. Upon development research we have found scenarios in which repainted factory bumpers created autopilot obstructions if primer and paint is too thick. As a result and to reduce risk of paint thickness interference all bumpers are intentionally more thin in this sensitive area. Please do not add additional material to thicken this area as it may create radar interference.
By installing or using this product, you understand and agree with the following: If you do not agree, do not proceed with the installation and return this product within 30 days for a full refund of the purchase price from the company from which you have purchased it.
- I understand and agree that this product is intended to be installed for use on private roads and in jurisdictions where the use of this product is deemed legal by the local authorities. Furthermore, I understand and agree Unplugged Performance does not have any knowledge or control of regulations in my local jurisdiction, and it is up to me to determine if the product is acceptable for use with my vehicle.
- I understand that Unplugged Performance has done testing of this product on road and on closed racetracks but does not have the ability to test the vehicle for localized standards and regulations.
- I understand and agree that if the vehicle manufacturer determines that any Unplugged Performance products have contributed to a problem with the vehicle it may affect the vehicle’s warranty. Furthermore, I understand and agree that Unplugged Performance has no duty nor ability to be involved in internal manufacturer decisions.
- I understand and agree that if this product is given to an installer for installation on my vehicle, I have read and agreed with all the previous, even if I am not personally installing these parts on my vehicle. Furthermore, I understand and agree that this product should be installed by a trained professional that is familiar with both the vehicle as well as this product. Furthermore, I understand and agree that I and/or my chosen installer will follow the installation instructions carefully and dutifully test the vehicle post-installation in a safe and controlled environment to ensure proper operation.
- I understand and agree that by installing this product Unplugged Performance and all associated persons and entities as well as the vehicle manufacturer and all associated entities must be held harmless in the event of any suit, damages, or other legal action. Furthermore, I hereby release Unplugged Performance and any associated entities from any and all liability for any potential claim or claims.
If you do not agree with any of the above statements, you should return the product immediately. For more information please see our Terms and Conditions.
REMOVE FRUNK TRIM PANELS

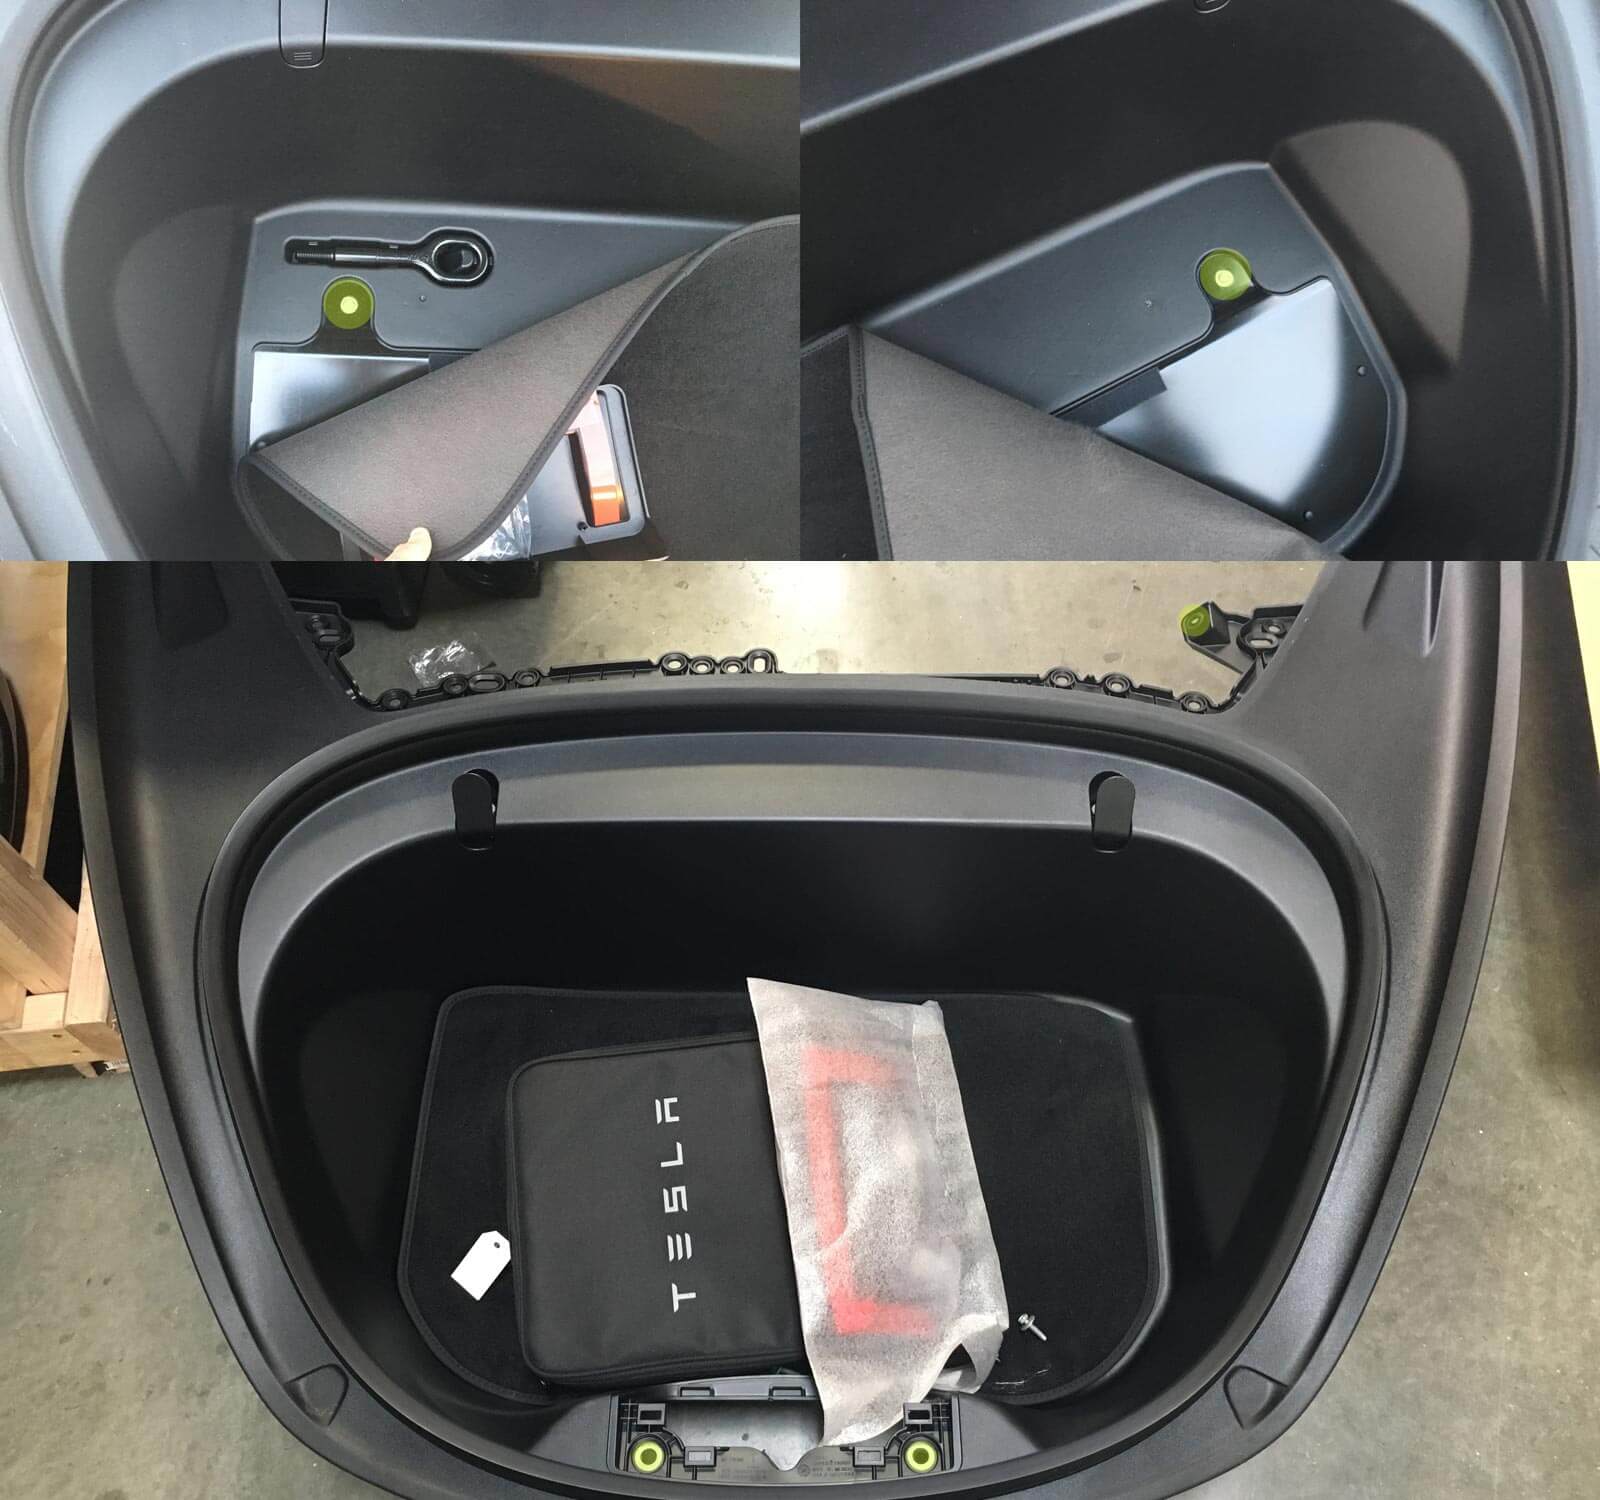

Prior to installation, the wheels, as well as the inner frunk trim panels must be removed for installation on all vehicles. To do so, begin by removing the plastic upper cowl cover trim panel (below the windshield) (FIGURE-1 ORANGE)
Next, flip up the small caps (FIGURE-1 YELLOW) and remove the two 10mm bolts.
Remove the front trim panel and lift up the rug and find the additional 10mm bolts securing lower section of the frunk tub to the chassis and remove them (FIGURE-2 YELLOW).
Remove the cowl duct by pulling firmly upward (releasing the white retaining clips) (FIGURE-3).
Pull up to remove the frunk tub.
REMOVE FACTORY FASCIA

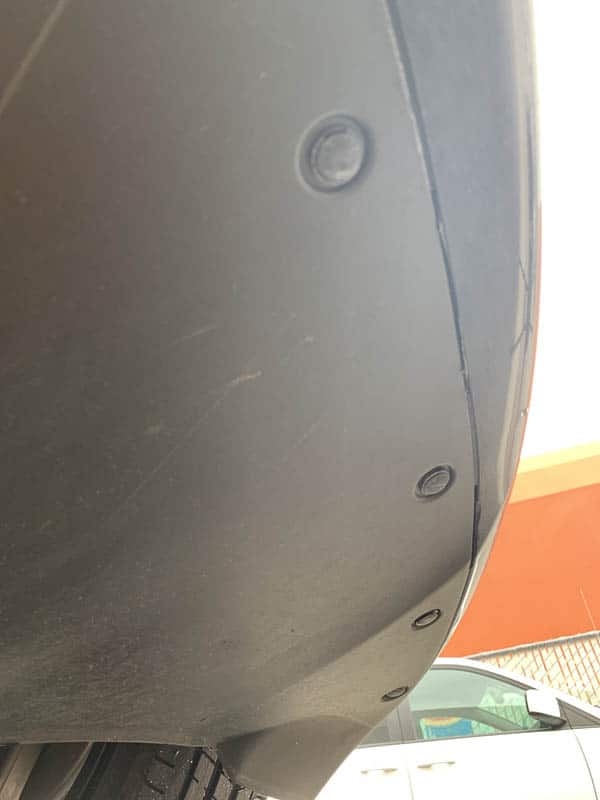

Remove push rivet retainers from the fender liners (FIGURE-4).
Pull back the fender liner, locate the 10mm nut behind the air guide and remove it (FIGURE-5).
Remove the push rivet retainers from the under cover. (FIGURE-6)
REMOVE FACTORY FASCIA


Remove the 10mm bolts attaching the factory fascia to the vehicle (FIGURE-7)
When the screws are removed, the factory fascia should be free to remove from the vehicle.
NOTE: WE HIGHLY RECOMMEND 2 OR MORE PEOPLE FOR THIS PROCESS.To remove, grasp each side of the factory fascia near the headlamp / fender and pull towards the front of the vehicle. (FIGURE-8)
While removing the factory fascia, you will need to unplug its wiring harness from the vehicle. The plug is located on the right side of the vehicle. (FIGURE-9)
REMOVE COMPONENTS FROM FACTORY FASCIA

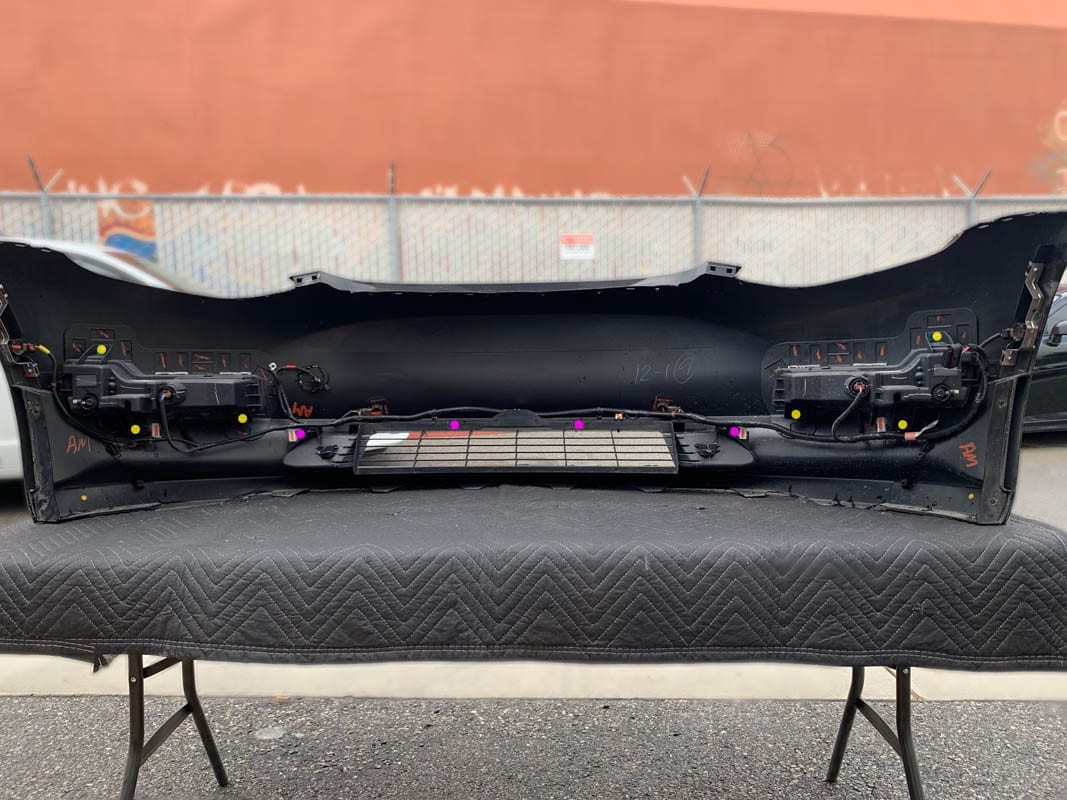
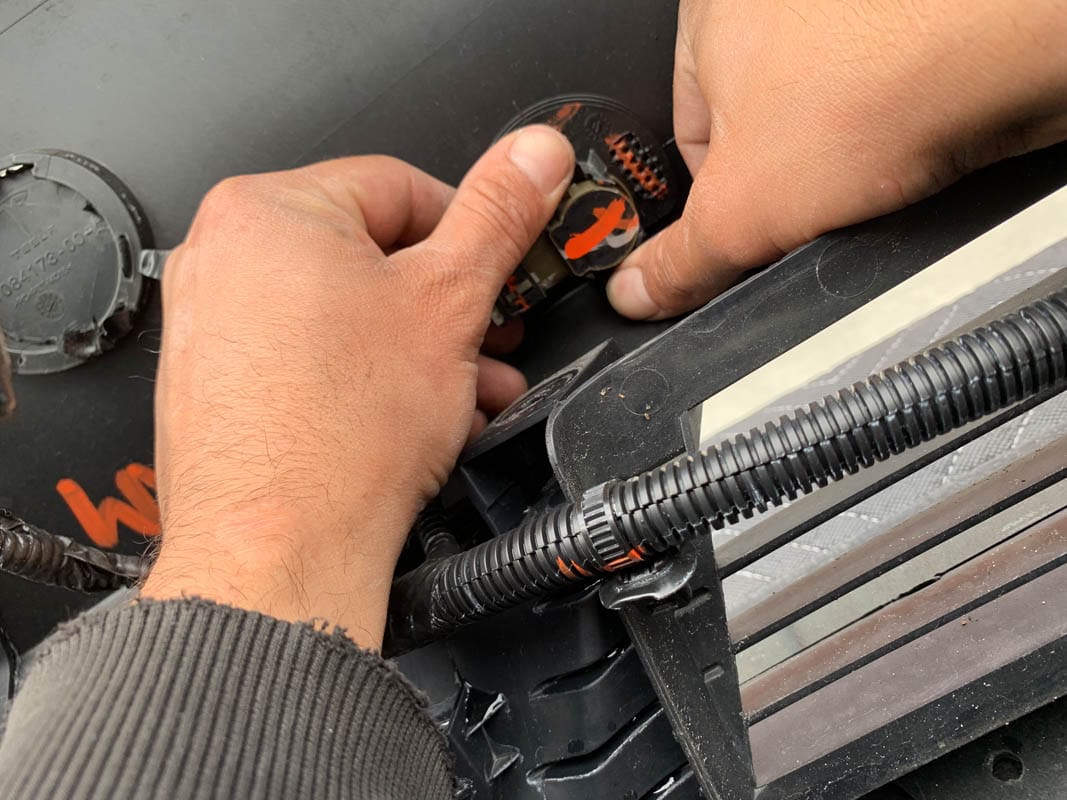

Detach the wiring harness from the factory fascia, unplugging the lamp modules, each of the parking sensors, as well as the motorized louvers. (At this time, also remove the emergency hood release contact from the tow loop receiver cover; it is attached via double-sided tape.) (FIGURE-10)
Remove the T-25 Torx screws that attach the lamp modules to the fascia (FIGURE-11 YELLOW).
Remove the four T-25 Torx screws that attach the motorized louvers to the fascia (FIGURE-11 PINK).
Detach the parking sensors from the factory fascia. Be careful to not damage the sensors, or the retainers attached to the factory fascia. (FIGURE-12)
Carefully pry the motorized louver module from the factory fascia tabs (FIGURE-13).
INSTALL FACTORY COMPONENTS


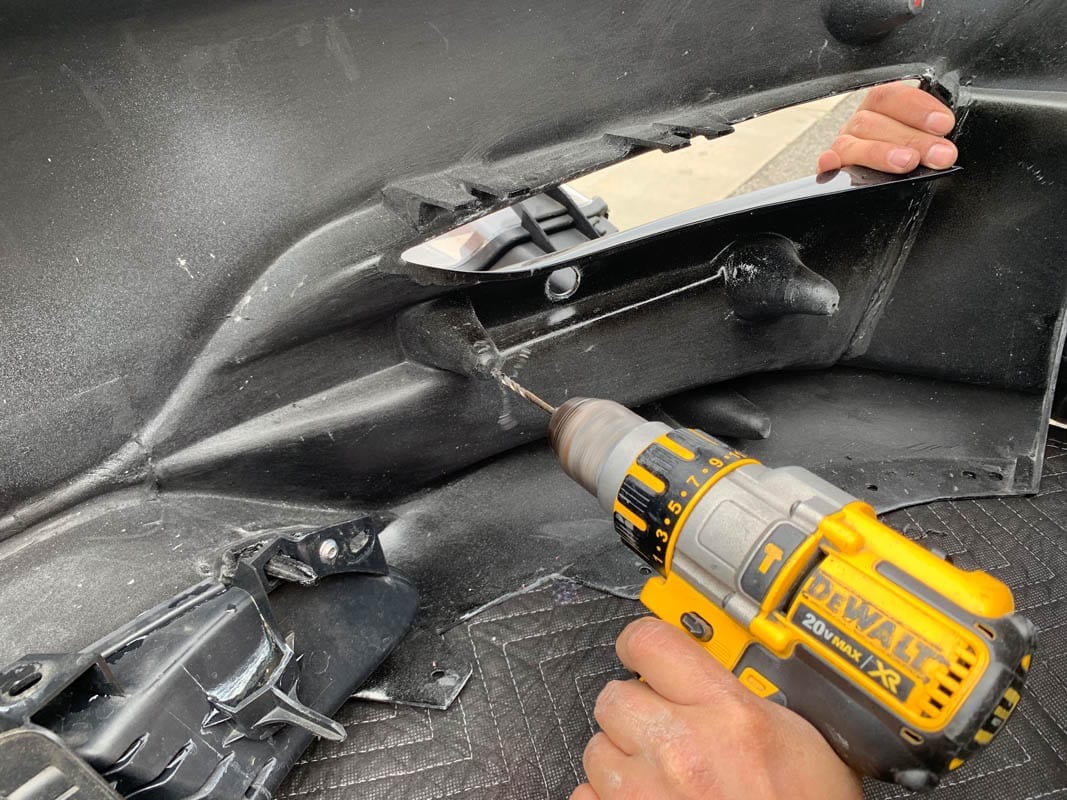

Next, the lamp modules, wiring harness and parking sensors will be transferred to the Ascension Front Fascia in reverse order of removal from the factory fascia. The wiring harness does not need to be re-clipped in place as it will pull on the sensors due to the bumper being longer than OEM. The harness will not move or shift.
The mounting bosses are left un-drilled to accommodate for the small variances in the factory components. Holes will need to be drilled when transferring the OEM components to the Ascension Fascia. Prior to drilling, fit the OEM components to their respective locations on the Ascension Fascia and mark the hole locations (FIGURE-14 + 15). Once the optimal position is found, drill the appropriate holes (FIGURE-16) into the mounting bosses using an 1/8” (3.50mm) drill bit.
Install the components using the factory screws (FIGURE-17).
INSTALL PARKING SENSOR HOLDERS


FIGURE-18 depicts the included replacement parking sensor holders (with the factory sensors installed for demonstration).
Prior to attempting to install the parking sensor holders onto the Ascension Fascia, we recommend lightly sanding and cleaning the surface area around the parking sensor holes (FIGURE-19).
Install the factory parking sensors into the supplied holders.
Remove the backing from the double-sided tape and apply the parking sensor holders, and affix them to the Ascension Fascia, noting the orientation (match the factory direction). Press firmly for at least 15 seconds to allow the double-sided tape to properly adhere. If you have trouble with sensor bracket mounts due to extreme weather conditions, you may consider using an adhesive promoter to ensure the brackets retain proper positioning. Any damages to the facia caused by the use of an adhesive promotor are not covered under warranty.
REATTACH WIRING HARNESS


Install and reconnect the factory wiring harness to the sensors, lamp modules and motorized louver panel (FIGURE-21 + 22).
ATTACH EMERGENCY HOOD RELEASE

Next, the emergency hood release will need to be attached to the Ascension Fascia’s included tow loop cover panel. To do so, the factory double-sided tape should be removed from the mount attached to the hood release positive lead, and new tape should be applied. Before attaching the tow loop cover panel, make sure to clean the backside of it thoroughly with alcohol to remove any surface contamination (if this is skipped, the double-sided tape may not properly adhere) (FIGURE-23)
INSTALL ASCENSION FASCIA ONTO VEHICLE


Prior to installation of the Fascia, we recommend taping the bottoms of the headlamps, as well as the leading edges of the front fenders to prevent accidental damage (FIGURE-24).
Follow steps 1 and 2 in reverse to install the Ascension Fascia onto the vehicle
NOTE: Don’t forget to reconnect the Fascia’s sub-harness prior to mounting the Fascia! (FIGURE-25)
TROUBESHOOTING GUIDE NOTES:

Prior to the paint and the final installation of the fascia, we always recommend test fitting to get accurate and consistent results.
Naturally not all Model 3’s have identical panel gaps and body panel alignment. As a result, every installer should take focus to optimizing specific vehicle fitment. In cases where fitment may need minor adjustment (example shown in image) we advise the following steps to optimize.
Step 1: Use calipers to accuratelu measure the needed amount of dimensional distance adjustment
Step 2: Prep the area for needed addition or subtraction of material for the adjustment determined. Note that the quality of sanding and cleaning will heavily determine the outcome of the adjustment.
Step 3: When subracting material, use a file or dremel tool, depending on the size of the adjustment. In the event that material needs to be added, use urethane filler such as 3M Urethane Repair or equivalent.
Step 4: Validate that the adjustments are correctly matched to the vehicle being installed prior to proceeding with paint and completion.