COILOVER INSTALL GUIDE
RELEASE OF LIABILITY AND PRODUCT WARRANTY
READ CAREFULLY – THIS AFFECTS YOUR LEGAL RIGHTS
This product carries a lifetime warranty against mechanical failure or corrosion. It can be exchanged for an identical item or a similar item as determined by Unplugged Performance. It may not be returned for cash or credit. There is no warranty regarding surface imperfections or aesthetic damage incurred during regular use, and/or damage to the brackets from an impact or other unusual driving circumstance.
By installation or use of this product you understand and agree with the following. If you do not agree, do not proceed with installation and return this product within 30 days for a full refund of the purchase price from the company from which you have purchased.
- I understand and agree that this product is intended to be installed for use on private roads and in jurisdictions where the use of this product is deemed legal by the local authorities. Furthermore I understand and agree Unplugged Performance does not have any knowledge or control of regulations in my local jurisdiction and it is up to me to determine if the product is acceptable for use with my vehicle.
- I understand and agree that this product affects the ride height of the vehicle and may make the vehicle more susceptible to damage from road debris, dips, inclines and other road hazards. Furthermore I understand that ride height adjustment may make the vehicle perform differently in emergency scenarios or in the event of a vehicle crash or impact. Furthermore I understand that Unplugged Performance has done testing of this product on road and on closed race tracks but does not have the ability to test the vehicle for localized standards and regulations.
- I understand and agree that lowering my vehicle will, in certain circumstances, require a different driving style and reduced speeds.
- I understand and agree that if the vehicle manufacturer determines that the lowered ride height contributed to a problem with the vehicle it may affect the vehicle’s warranty. Furthermore, I understand and agree that Unplugged Performance has no duty nor ability to be involved in internal manufacturer decisions.
- I understand and agree that if this product is given to an installer for installation on my vehicle, I have read and agreed with all of the previous, even if I myself am not personally installing these parts on my vehicle. Furthermore, I understand and agree that this product should be installed by a trained professional that is familiar with both the vehicle as well as this product in particular. Furthermore, I understand and agree that I and/or my chosen installer will follow the installation instructions carefully and dutifully test the vehicle post-installation in a safe and controlled environment to ensure that it is operating properly.
- I understand and agree that by installing this product Unplugged Performance and all associated persons and entities as well as the vehicle manufacturer and all associated entities must be held harmless in the event of any suit, damages, or other legal action. Furthermore, I hereby release Unplugged Performance and any associated entities from any and all liability for any potential claim or claims.
If you do not agree with any of the above statements, you should return the product immediately. For more information please see our Terms and Conditions.

PLEASE NOTE:
THE VEHICLE MUST BE LIFTED COMPLETELY OFF THE GROUND AND SHOULD REMAIN OFF THE GROUND UNTIL INSTALLATION IS COMPLETE.
YOUR COILOVER KIT CONTENTS MAY VARY BASED ON THE KIT ORDERED
CONTENTS LIST:
- 2- FRONT STRUTS
- 2- FRONT SPRINGS
- 2- REAR SHOCKS
- 2- REAR SPRINGS
- 1- THRUST SHEET BEARING KIT (FRONT ONLY)
- 2- SPANNER WRENCHES
- 1- 2MM ALLEN KEY
- 2- FRONT BLUE ADJUSTER KNOBS
REMOVE FRUNK TRIM PANELS

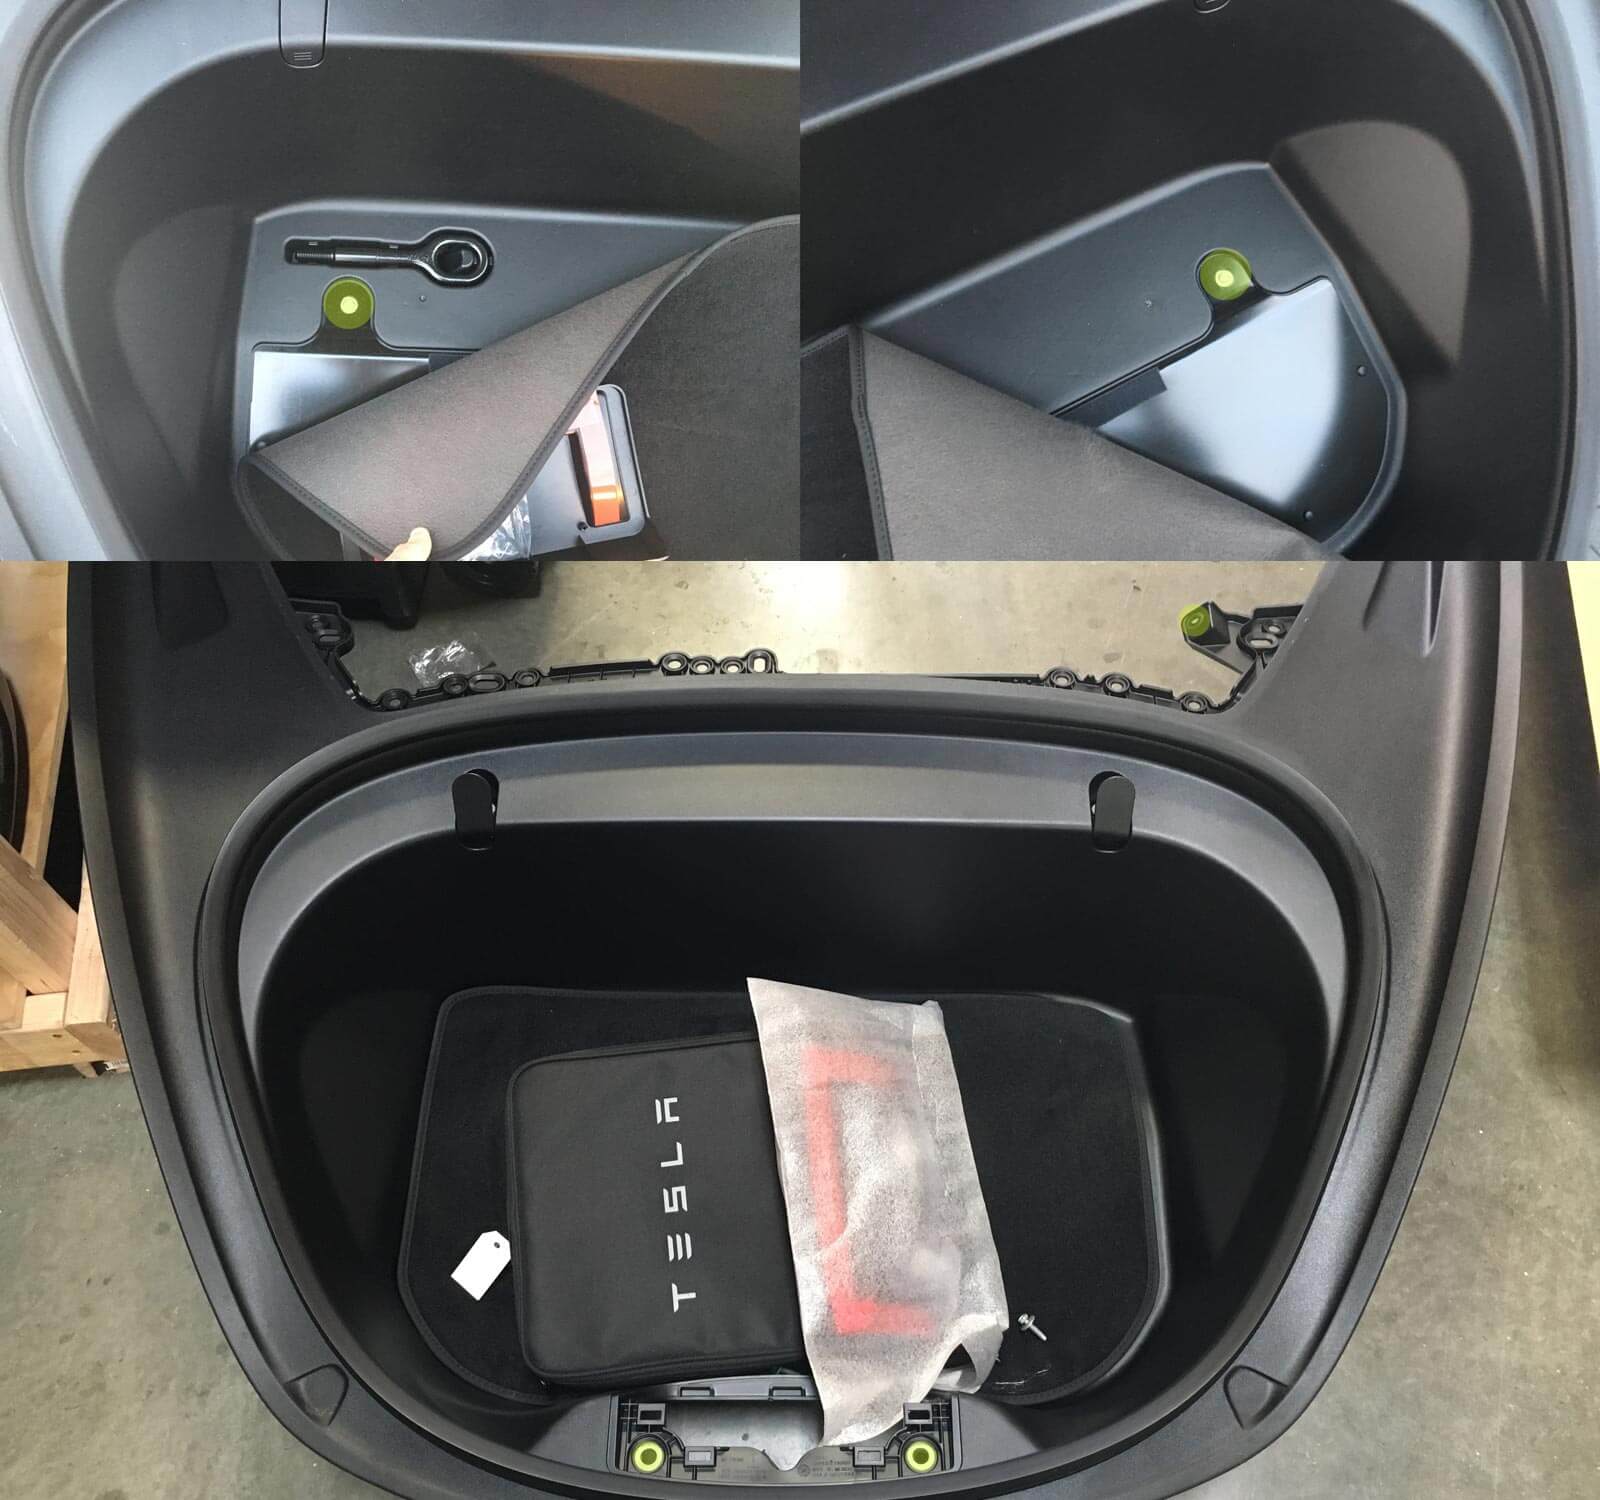
Prior to installation, the frunk needs to be removed. To do so, begin by removing the upper plastic cowl below the windshield. (Figure-1 Orange)
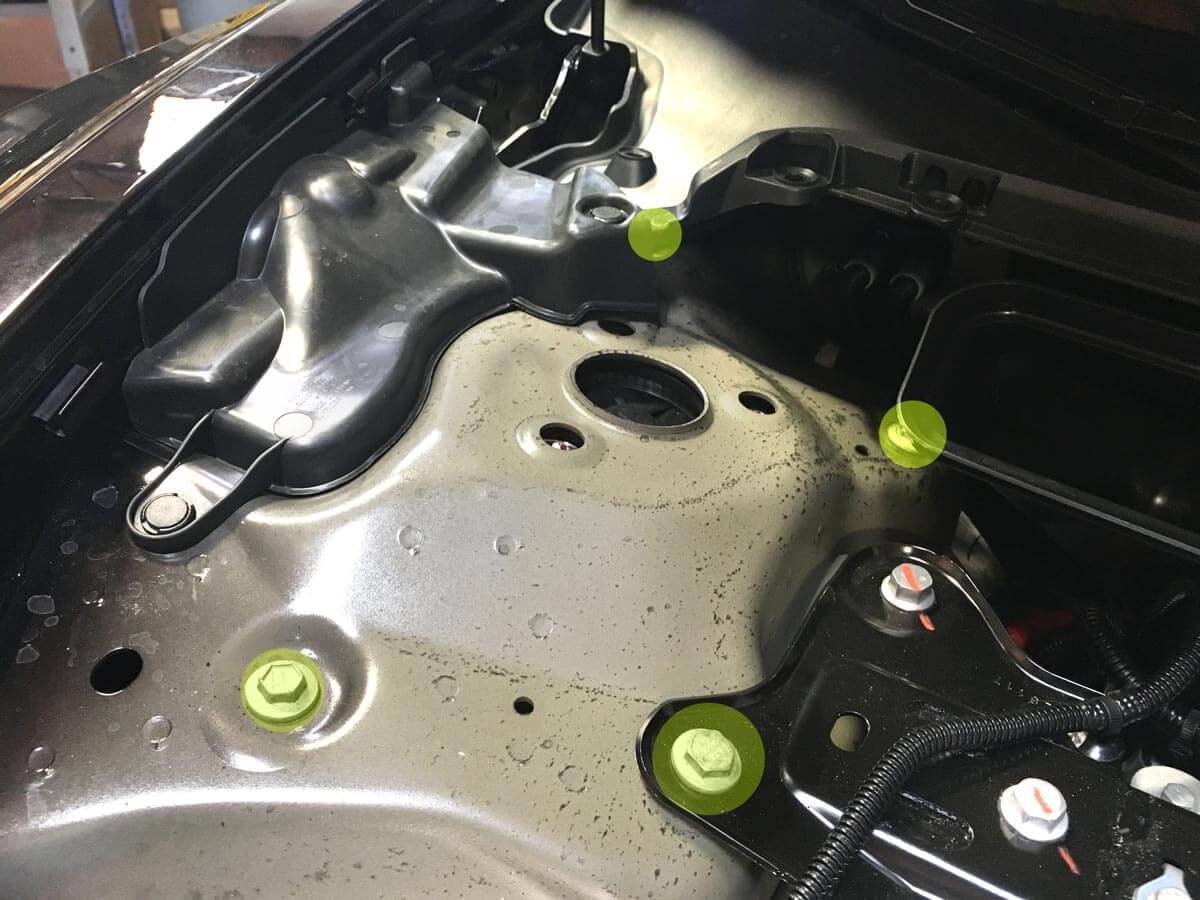
Next, the 2 10mm bolts just below. (Figure 1- Yellow)
Next, 2 more 10mm bolts in the frunk and finally remove the front piece where the frunk latches by gently prying from the bottom up revealing 2 more 10mm bolts. Careful when removing this piece as there is a wire which connects to the emergency frunk release button. (Figure-2 Yellow)
REMOVE FRONT DAMPER & SPRING ASSEMBLIES


Remove black rubber corner pieces that are held in by 2 plastic push clips. These can be easily removed using a flat head screwdriver.
Once pieces are removed there will be 1 more plastic push clip that holds down the plastic piece covering one bolt. This will need to be removed on both sides.
Now, you will have access to 4 bolts (2 15mm bolts and 2 13mm bolts. These can now be fully removed. (Figure- 3 Yellow)
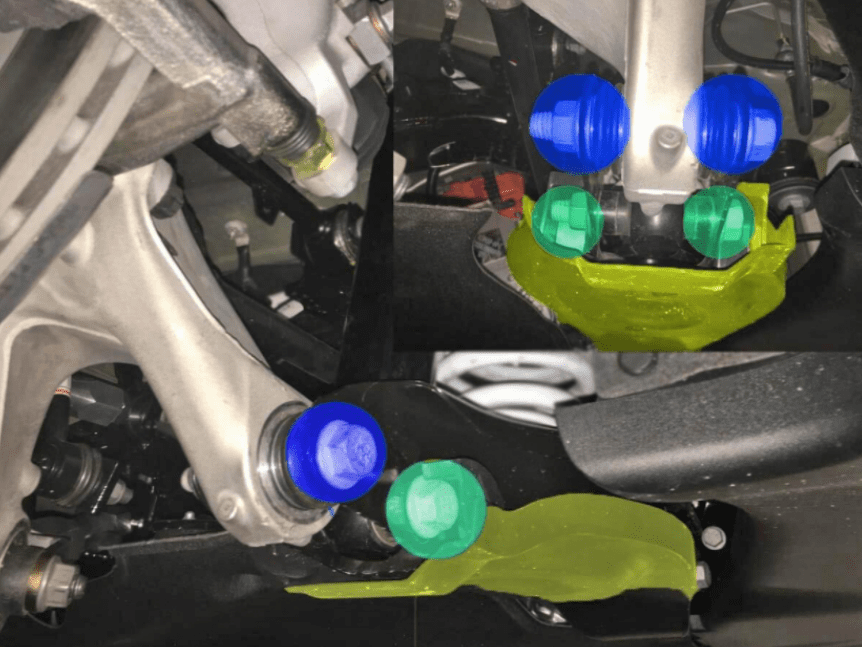
We can now head into the wheel well. Remove 18mm nut that holds endlink to strut. (Figure- 4 Green)
Remove 15mm bolt that holds front upper control arm using a T50 and a 15mm socket. (Figure 5 Yellow)
Remove 21mm bolt and nut that secure strut assembly to lower control arm using a 21mm wrench and 21mm socket. (Figure- 4 Blue)
REMOVE FRONT SUSPENSION TOP MOUNT

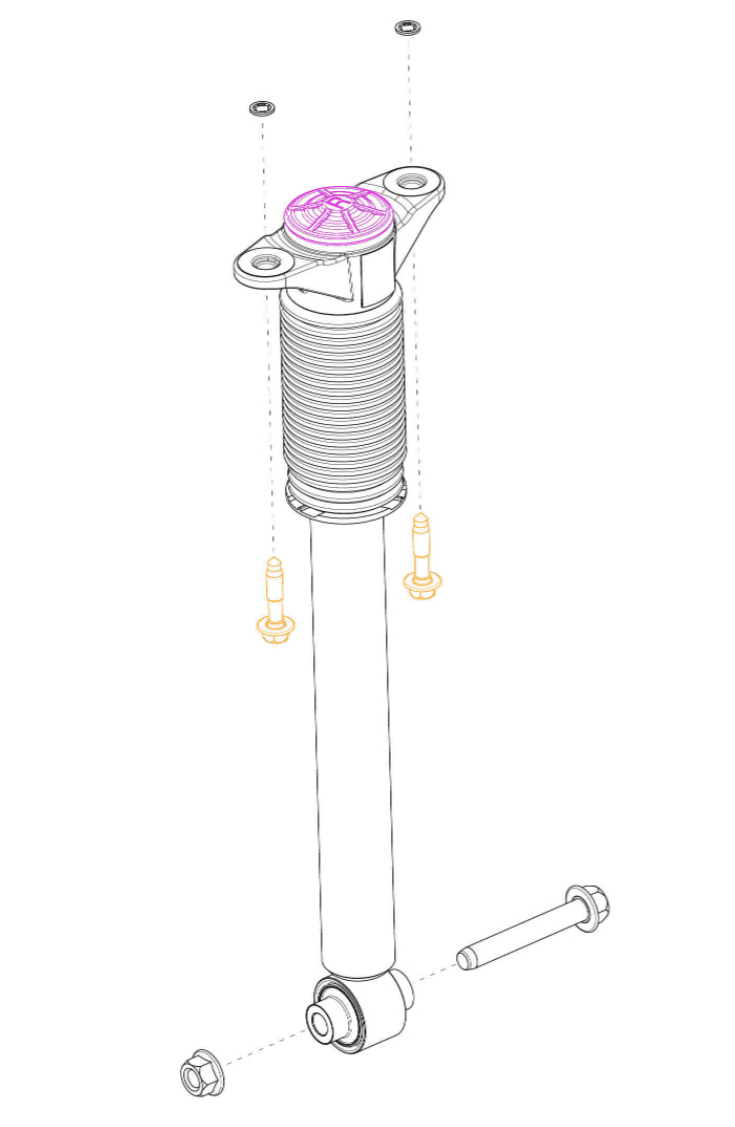
Remove the three 13mm nuts securing the upper assembly to the strut assembly. (Figure- 6 Orange)
NOTE: SPRING COMPRESSOR IS REQUIRE TO REMOVE OEM TOP HATE AND TO COMPRESS SPRING TO MOVE OEM TOP HAT TO COILOVER ASSEMBLY.
Compress OEM spring and remove dust cover from the top of the strut. Once spring is compressed top 17mm nut can be removed freeing top hat from OEM assembly. (Figure- 6 Pink)
ASSEMBLE FRONT COILOVER


Compress new coilover spring and reinstall top hat ensuring spacer is installed UNDER the top hat and use new 14mm Nut to secure top hat to strut assembly.
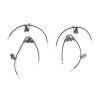
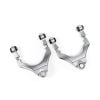
Reinstall front upper control arm assembly. (Figure- 7 and Figure- 8)
RECOMMENDED TORQUE SPECS:
- 14MM TOP SHOCK NUT= 25FTLBS
- 3-13MM NUTS THAT SECURE FRONT UPPER CONTROL ARM ASSEMBLY TO STRUT ASSEMBLY= 12FTLBS
- 2-15MM UPPER BOLTS=46FTLBS
- 2- 13MM UPPER BOLTS= 26FTLBS
- 15MM NUT AND T50 BOLT= 41FTLBS
- 18MM ENDLINK NUT= 73FTLBS
- RECOMMENDED PRELOAD SET, YOU MAY NEED TO ADJUST PRELOAD FOR YOUR SPECIFIC VEHICLE.
NOTE: PRE-LOAD CAN BE ADJUSTED USING A LARGER COLLAR AND UNLOCKED BY A SMALLER COLLAR DIRECTLY BELOW. SPINNING UP WITH INCLUDED SPANNER WRENCHES WILL INCREASE PRELOAD. HEIGHT ADJUSTMENT WILL BE NECESSARY TO REACH DESIRED HEIGHT
Rubber Sheet Isolator Rings
There are kits that may have arrived with rubber isolators.
These are placed on the bottom of the front perch.
INSTALL ADJUSTER

A small notch must be made in the OEM Top hat plastic to tighten the adjuster onto the adjustment knob. (Figure- 9 Yellow)
The Damper rebound stiffness is adjustable; please refer to or seek professional advice to make adjustments.
From the top point of view, it should click at detents every few degrees. There are a total of 32 steps in the adjustment range.
Typically ideal settings are within 10~15 clicks of default measurements for the springs provided and can adapt to other specification springs outside of that range.
REMOVE REAR SPRING AND SHOCK
Start by removing rear lower perch covers. There are held on by a single 10mm bolt near the center of the arm. (Figure- 10 Yellow)
Upward pressure needs to be applied either with a floor jack or transmission jack in order to relieve tension from the 2 21mm bolts that connect the lower perch to the shock and hub. Typically, the shock bolt can be removed first followed by the hub bolt but this can vary. (Figure-10 Blue and Green)
Once the bolts are removed you can now bring the perch down releasing the oem spring.
Next, fully loosen the 2 15mm bolts at the top of the shock on either side. You can not fully remove these bolts as they have a plastic retainer. Once this is completed the shock can now be removed. (Figure- 11 Orange)
INSTALL REAR COILOVER

Once the shock has been removed, remove the top dust cap and remove the center 17mm nut securing the top hat to the shock.
This piece will be transferred over to the new shock. Use the included 14mm nut to secure the OEM top hat piece to the new shock(27FTLBS).
Reinstall the dust cap. (Figure- 12)
Reinstall the shock back into place and tighten 2 15mm bolts (30FTLBS)
In the rear, be sure to follow the reference chart to setup the shock absorber (Damper) to the correct stroke range using the bottom bracket adjustments and calibrate the stroke range at ground level, tires loaded.
INSTALL REAR SPRING


NOTE: SPRING MUST BE INSTALLED IN THIS ORDER. OEM UPPER RUBBER PIECE, SPRING, STAINLESS THRUST SHEET, WHITE DELRN THRUST SHEET, LOWER SPRING PERCH.
Install spring assembly into lower arm first. Use the jack to apply upward pressure and insure the top of the spring seats correctly.
Once everything is in place, apply pressure until both 21mm bolts can be inserted.
You may need to insert one, apply more pressure, and insert the second one.
Once both bolts are in you can remove the jack and hand-tighten the 21mm nuts.
These bolts are to be tightened fully(85ftbls) once the car is on its own weight.
Failure to do so can result in increased bushing wear and incorrect heights.


| Coilover Setting Quick Reference | |||
| Model Y Luxury Coilover | |||
| *Stock Height (AWD)(approx. varies by options and model year) | Lowered Approx. .1″ | Max Low (Approx. 1.75″) | |
| A | 75 mm (87 mm with Delrin Spring Base) | 75 mm (87 mm with Delrin Spring Base) | 75 mm (87 mm with Delrin Spring Base) |
| B | 45 mm (33 mm with Delrin Spring Base) | 35 mm (23 mm with Delrin Spring Base) | 15 mm ( 3mm with Delrin Spring Base) |
| C | 45 mm | 35 mm | 25 mm |
| D | 160 mm | 150 mm | 135 mm |
| Model Y Dirt Snow Coilover | |||
| *Stock Height (AWD)(approx. varies by options and model year) | Raised Approx. 1″ | Max Raised (Approx. 1.75″) | |
| A | 75 mm (87 mm with Delrin Spring Base) | 75 mm (87 mm with Delrin Spring Base) | 75 mm (87 mm with Delrin Spring Base) |
| B | 45 mm (33 mm with Delrin Spring Base) | 65 mm (53 mm with Delrin Spring Base) | 85 mm (73 mm with Delrin Spring Base) |
| C | 35 mm | 45 mm | 60 mm maximum height |
| D | 175 mm | 185 mm | 195 mm |
| Model 3 Comfort Coilover | |||
| *Stock Height (AWD) (approx. varies by options and model year) | Lowered Approx. 1″ | Max Lowered (Approx. 1.75″) | |
| A | 75 mm (87 mm with Delrin Spring Base) | 75 mm (87 mm with Delrin Spring Base) | 75 mm (87 mm with Delrin Spring Base) |
| B | 40 mm (28 mm with Delrin Spring Base)) | 25 mm (18 mm with Delrin Spring Base) | 10 mm (8 mm with Delrin Spring Base) |
| C | 45 mm | 30 mm | 20 mm bottomed |
| D | 150 mm | 140 mm | 125 mm |
| * For Product Shipped After 10/2022 | |||
* Actual Height Measurements will slightly differ depending on model year, options, and
|
|||