TESLA CYBERTRUCK UP INVINCIBLE®
Roof Light Bar
INSTALLATION GUIDE
- UP Light Bar – Qty 1
- Light Bar Mounting Bracket Pair – Qty 1
- 5mm M8 Short Allen Screw for Light Bar Brackets – Qty 1
- M8 Lock Washer Pair – Qty 2
- 13mm Bolt for Light Bar Brackets
- M8x1.25 Nut Pair – Qty 1
- Roof Rack – Qty 1
- Roof Rack Support Bracket Pair – Qty 1
- 5mm M8 Long Allen bolt for Roof Rack Support Brackets and End Plates – Qty 8
- 13mm M8 lock nut for Roof Rack Support Brackets – Qty 4
- M8 Washers – Qty 8
- 3 pin to 4 pin Adapter – Qty 1
- 3 Pin Pigtail Wire Harness
All UP hardware involved in this installation is rated for 12 ft/lbs, and all factory hardware involved is rated for 6ft/lbs.
By installing or using this product, you understand and agree with the following: If you do not agree, do not proceed with the installation and return this product within 30 days for a full refund of the purchase price from the company from which you have purchased it.
- I understand and agree that this product is intended to be installed for use on private roads and in jurisdictions where the use of this product is deemed legal by the local authorities. Furthermore, I understand and agree Unplugged Performance does not have any knowledge or control of regulations in my local jurisdiction, and it is up to me to determine if the product is acceptable for use with my vehicle.
- I understand that Unplugged Performance has done testing of this product on road and on closed racetracks but does not have the ability to test the vehicle for localized standards and regulations.
- I understand and agree that if the vehicle manufacturer determines that any Unplugged Performance products have contributed to a problem with the vehicle it may affect the vehicle’s warranty. Furthermore, I understand and agree that Unplugged Performance has no duty nor ability to be involved in internal manufacturer decisions.
- I understand and agree that if this product is given to an installer for installation on my vehicle, I have read and agreed with all the previous, even if I am not personally installing these parts on my vehicle. Furthermore, I understand and agree that this product should be installed by a trained professional that is familiar with both the vehicle as well as this product. Furthermore, I understand and agree that I and/or my chosen installer will follow the installation instructions carefully and dutifully test the vehicle post-installation in a safe and controlled environment to ensure proper operation.
- I understand and agree that by installing this product Unplugged Performance and all associated persons and entities as well as the vehicle manufacturer and all associated entities must be held harmless in the event of any suit, damages, or other legal action. Furthermore, I hereby release Unplugged Performance and any associated entities from any and all liability for any potential claim or claims.
If you do not agree with any of the above statements, you should return the product immediately. For more information please see our Terms and Conditions
Using a 5mm Allen key, secure the provided Roof Light Bar Brackets to the Roof Light Bar using the provided bolt and lock washers. Do not apply final torque until later.

Using a 13mm socket, fasten the Roof Light Bar Brackets to the upper Roof Rack Bar using the provided bolts, lock washers, and nuts. Place the lock washer on the back side with the nut to ensure the hardware stays locked in place.

Torque Using a 13mm socket and a torque wrench, torque each nut to 12 ft/lbs.


Using a 15mm socket and a 5mm allen key, fasten the Roof Rack Support Bracket to the upper Roof Rack using 2 bolts, 4 washers, and 2 lock nuts on each side as shown below. Only apply nuts hand tight, do not apply final torque until later on. It is critical to partially thread these locknuts prior to installing the Roof Rack onto the car as space is extremely limited once installed on the vehicle.


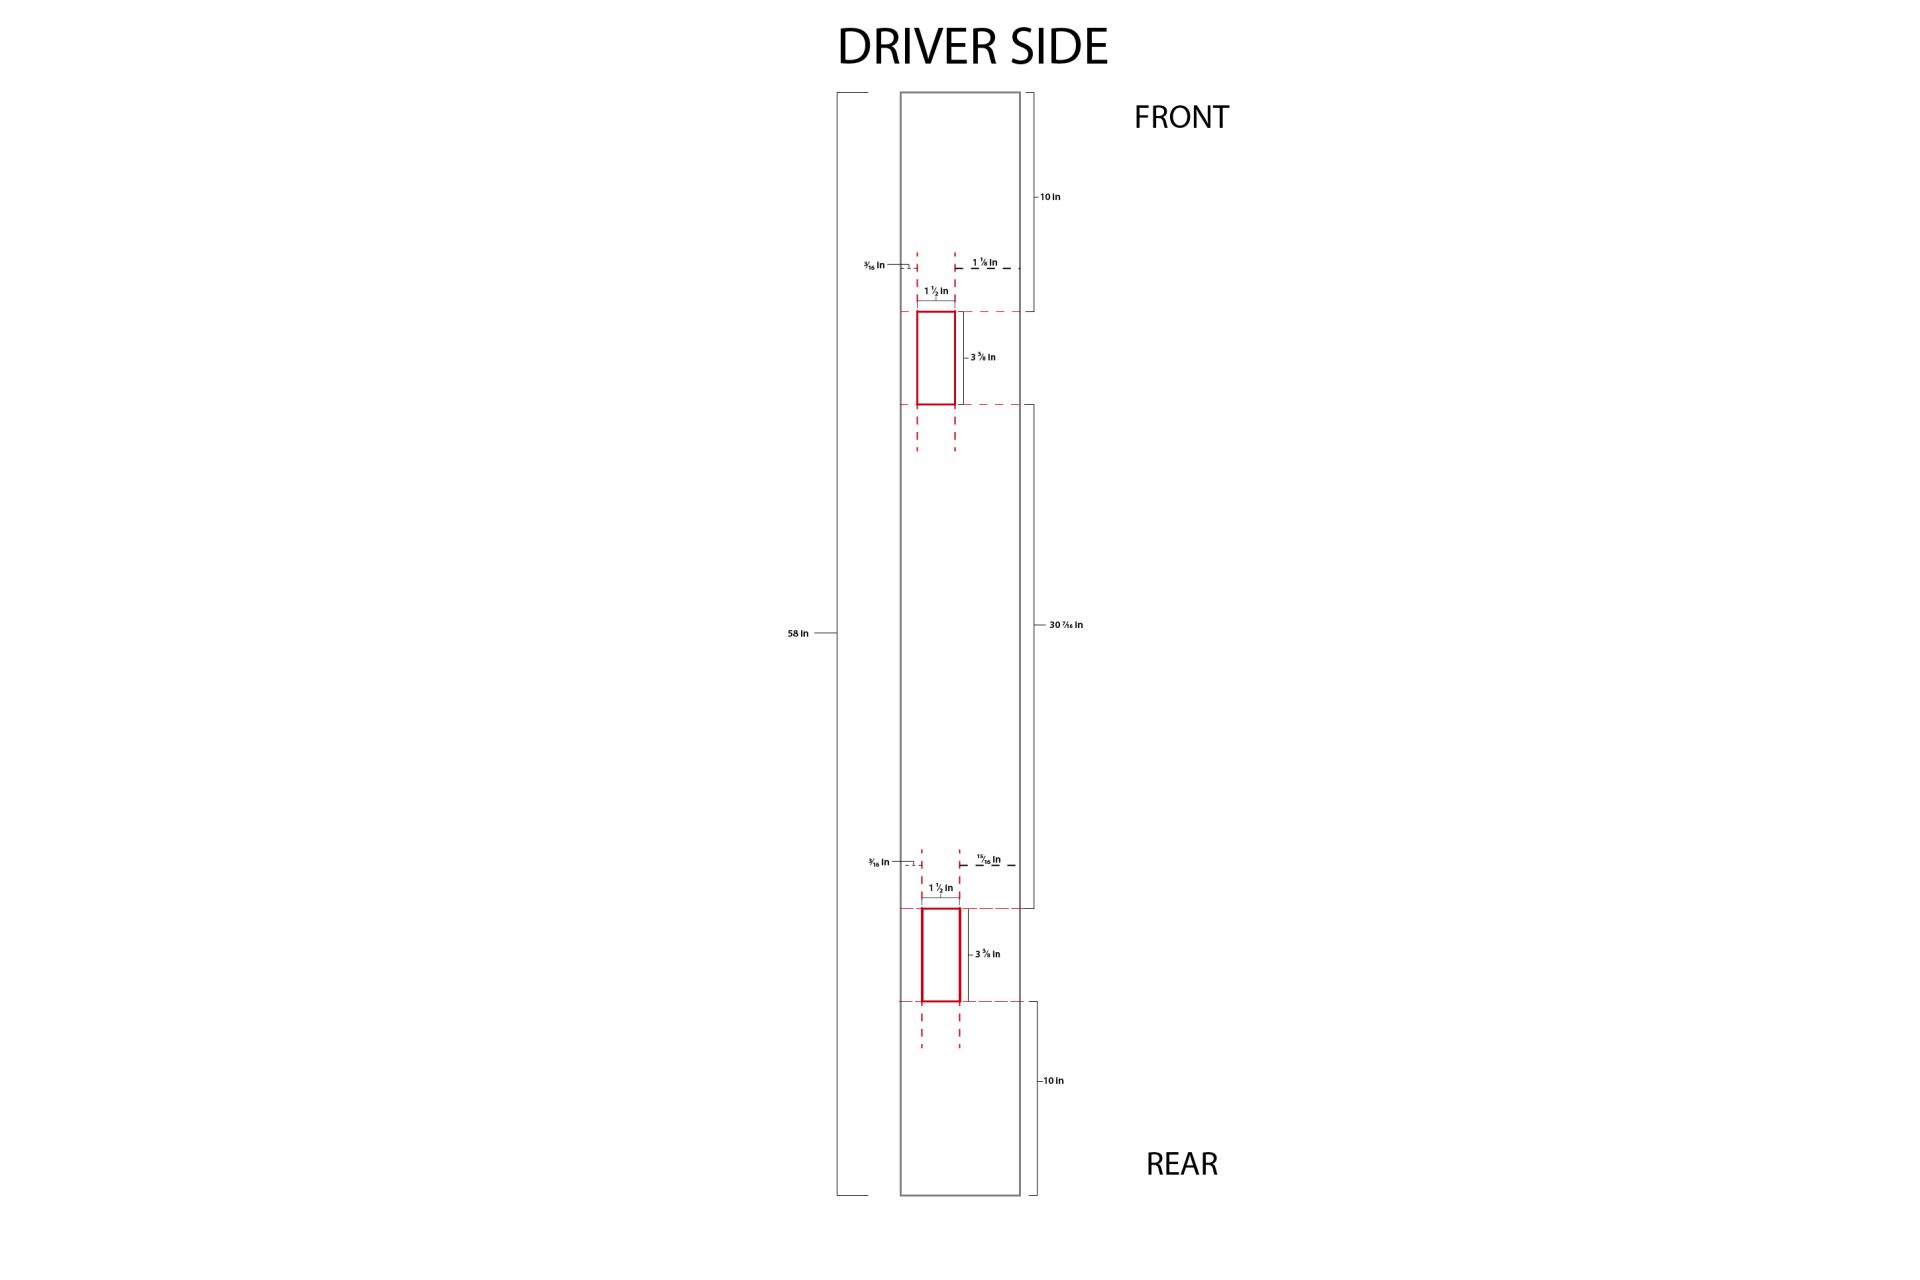
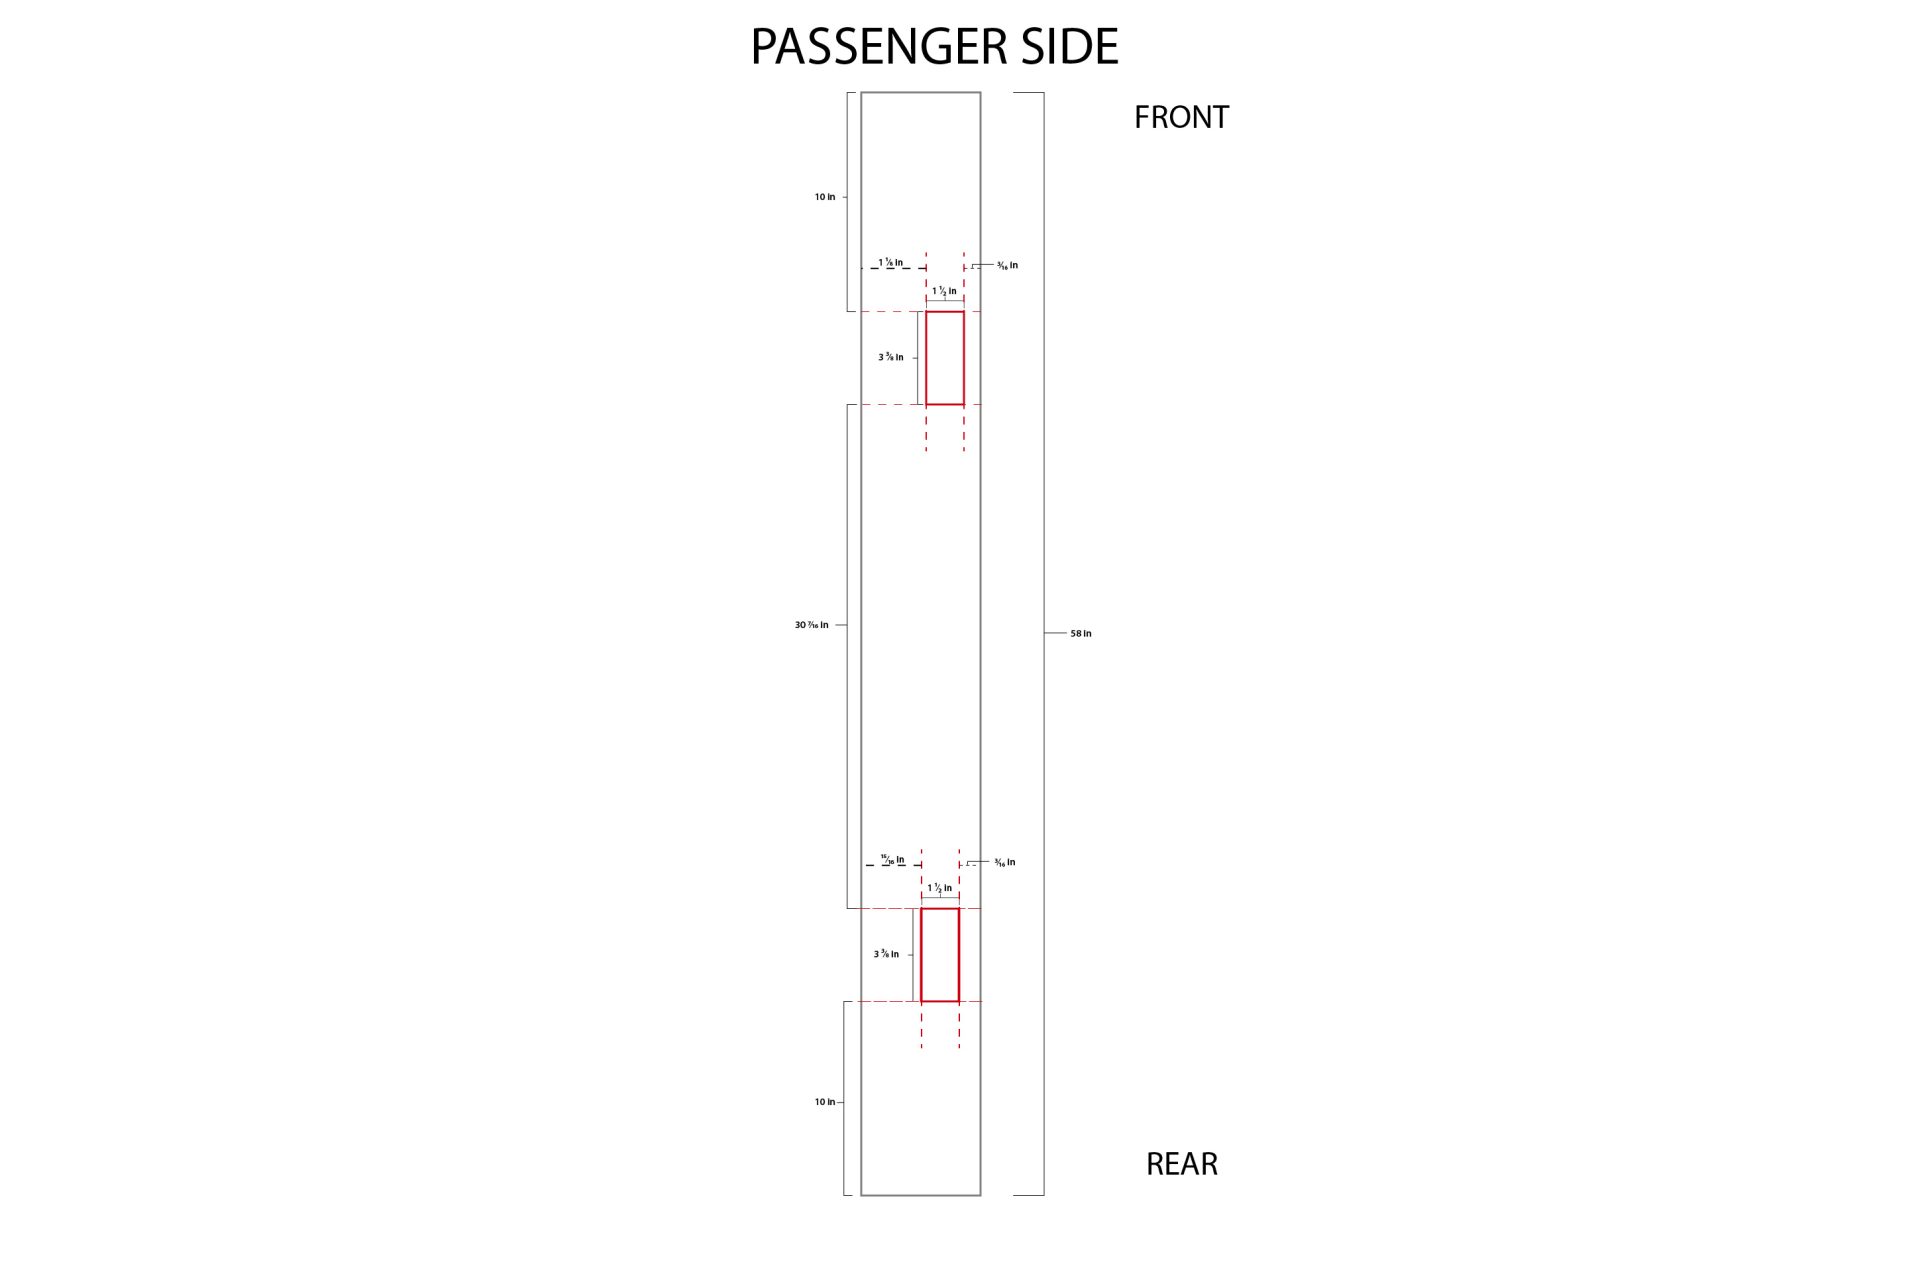
If your Cybertruck is NOT a foundation Model, your factory trim may not offer access to the factory roof anchor points. If this is the case, you may need to either replace your factory trim with a foundation equivalent, OR you can reference the following diagram to create an access point to allow access to the factory roof mount anchor points. If you have a foundation vehicle with factory anchor point access, proceed past the following diagrams.
For those who do not have a factory accessible roof power feed, consider sourcing the factory power feed cable (P1866224-00-F) from Tesla to avoid splicing into a factory cable assembly and possibly forfeiting your factory electrical warranty. Using a Tesla OE cable extension that utilizes the factory socket connection is the proper methodical approach to preserving your factory electrical warranty.
First, uncover the 2 upper factory anchor points by pressing down on the inner edge to open the flap.

Using a 10mm socket, remove the 2 factory lock nuts. These will be used to secure the Roof Rack Support Bracket to the vehicle. Note that the factory roof accessory power cable will be found on the passenger side anchor point. Be sure to move the cable out of the way to access the 10mm nuts for removal.

Using 2 sets of hands, transfer the Roof Light Bar assembly to the top of the vehicle by sliding the bracket slots over the factory anchor studs.. Use caution when moving the Roof Rack Support Brackets to ensure the roof glass does not get damaged in this process. Consider covering the roof glass with a protective cover during this stage.

Once the Roof Rack Support Brackets have been installed over the factory anchor studs, proceed to torque the 4 bolts and nuts securing the Roof Rack Support Brackets to the Roof Rack. Ensure the Roof Rack is centered over the Roof Rack Support Bracket to ensure that the endplate spacing is correct later on. Using a 5mm allen key and a 15mm socket to counter hold the locknut, torque all 4 bolts to 12 ft/lbs.

Using a 10mm socket, fasten the factory lock nuts to the factory anchor points to secure the Roof Rack Support Brackets to the vehicle. Torque to 6 ft/lbs.


Now that the Roof Rack and Light Bar have been secured to the vehicle, be sure that the Roof Power Feed is turned off in the on screen menu as shown below.

The following wiring instructions are intended for factory controlled exterior lighting control. If you plan to integrate a 3rd party lighting control module, reference the steps at the bottom of the installation guide.
Next, uncover the factory Roof Power Feed cables by removing the tape to expose 3 cables.


Using wire strippers, remove the factory wire covering to expose the metal lead ends as shown below.

Using wire strippers, remove the wire covering on the provided 3-pin cable adaptor as shown below.

Match the relative colors and secure the cables to each other. Using a soldering tool is not required, however it is highly recommended. Consider using electrical tape, and or shrink tube to protect the new connection point when it is exposed to the elements.

Once each connection point is individually connected and protected, proceed to protect all 3 connection points with additional electrical tape or shrink tube as shown below.

Once this is done, you will connect the 4 pin light bar wire assembly to the 3 to 4 pin socket adapter harness, as well as the 3 pin roof power cable assembly to the 3 to 4 pin adapter cable.

Now that the cable assembly is fully connected, test the light bar to ensure that everything is working properly. Be sure to do this in a safe location to ensure the light bar does not negatively impact others when tuning the preferred height setting. Once you have found a clear testing area, navigate to the Roof Power Feed option and toggle the switch to the “ON” position. If the lightbar is not turning on, turn off the Roof Power Feed and check the connectors. If everything seems to be connected properly and issues persist, reach out to your local installer, or to us directly at support@unpluggedperformance.com for further assistance.

Now that your light bar is on, you can adjust the projection angle to suit your needs.

Once you find a position you like, using a 5mm allen key, torque to 12 ft/lbs.

If you have excess cable length, use a ziptie, or any other cable management accessory of your choice, and tuck the excess cable material underneath the roof rack bar.

Now that the light bar is fully assembled and functioning properly, proceed to install the Roof Rack end plates to complete the Roof Rack Light Bar installation. Using a 5mm allen key, fasten each endplate using 2 provided bolts and washers. Note that the endplate taper should follow the vehicle bodyline.

Once the endplate is centered, using a 5mm Allen key, torque each end plate bolt to 12 ft/lbs.

Congratulations! Your UP INVINCIBLE Roof Light Bar installation is complete!
The UP INVINCIBLE Roof Light Bar is supplied with a 4-pin connector directly out of the light bar cable assembly.
Red power, yellow DRL, white DRL, black ground
This is intended to allow for more specific lighting control as the UP INVINCIBLE Roof Light Bar has a variety of different settings to choose from when using an external controller.
If you choose this route, you will need to remove the included 3-pin pigtail adapter from the provided configuration, and splice the wiring harness that is fixed to the light bar, and integrate the coms line in order to allow the light bar settings beyond a simple “ON/OFF” function, which is all that is offered from the factory on screen options.
If you are using a professional installer, they may reference Tesla service documents to locate and access the Passenger B-Pillar Power Feed access point. This is specifically intended to help tuck excess wiring. You will essentially need to splice the 4 cables from the light bar to the 3 cables at the factory roof power feed cable assembly. For optimal placement consider feeding the wiring harness through the roof access point down into the pillar to bring the connect points away from exposure to the elements. Reassemble the B-pillar accordingly after the light bar has been tested and is working properly.