My Account My Account
Menu
HD Rear Sway Bar

TESLA CYBERTRUCK UP INVINCIBLE®
HD Rear Sway Bar
INSTALLATION GUIDE

  • Parts List
  • Tool List
  • Torque Specs
  • Release of liability and product warranty
  • 01 Step 1: Lift the Vehicle
  • 02 Step 2: Remove Rear Diffuser
  • 03 Step 3: Remove Factory Rear Sway Bar and Endlinks
  • 04 Step 4: Assemble Rear Sway Bar
  • 05 Step 5: Install UP Rear Sway Bar
  • 06 Step 6: Reinstall Rear Diffuser
Parts List
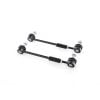
  • REAR SWAY BAR – QTY 1
  • REAR SWAY BAR BRACKETS – QTY 2
  • REAR SWAY BAR BRACKET WASHERS – QTY 4
  • REAR SWAY BAR BUSHINGS – QTY 2
  • REAR SWAY BAR BACKING PLATES – QTY 2
  • REAR SWAY BAR BUSHING GREASE PACK – QTY 1

INVINCIBLE CYBERTRUCK REAR SWAY BAR INSTALLATION0001

NOTE: Most factory hardware will not be re-used unless specified. However, be sure to keep all factory hardware until the final install is complete.

Tool List
  • 10mm Socket
  • 15mm Socket
  • T30 Torx Socket
  • Clip Removal Tool
  • Flat Head Screw Driver
  • Impact Gun or Ratcheting Wrench
  • Torque Wrench
  • Safety Gloves
Torque Specs

Please see individual steps for torque specs.

Release of liability and product warranty

By installing or using this product, you understand and agree with the following: If you do not agree, do not proceed with the installation and return this product within 30 days for a full refund of the purchase price from the company from which you have purchased it.

  • I understand and agree that this product is intended to be installed for use on private roads and in jurisdictions where the use of this product is deemed legal by the local authorities. Furthermore, I understand and agree Unplugged Performance does not have any knowledge or control of regulations in my local jurisdiction, and it is up to me to determine if the product is acceptable for use with my vehicle.
  • I understand that Unplugged Performance has done testing of this product on road and on closed racetracks but does not have the ability to test the vehicle for localized standards and regulations.
  • I understand and agree that if the vehicle manufacturer determines that any Unplugged Performance products have contributed to a problem with the vehicle it may affect the vehicle’s warranty. Furthermore, I understand and agree that Unplugged Performance has no duty nor ability to be involved in internal manufacturer decisions.
  • I understand and agree that if this product is given to an installer for installation on my vehicle, I have read and agreed with all the previous, even if I am not personally installing these parts on my vehicle. Furthermore, I understand and agree that this product should be installed by a trained professional that is familiar with both the vehicle as well as this product. Furthermore, I understand and agree that I and/or my chosen installer will follow the installation instructions carefully and dutifully test the vehicle post-installation in a safe and controlled environment to ensure proper operation.
  • I understand and agree that by installing this product Unplugged Performance and all associated persons and entities as well as the vehicle manufacturer and all associated entities must be held harmless in the event of any suit, damages, or other legal action. Furthermore, I hereby release Unplugged Performance and any associated entities from any and all liability for any potential claim or claims.

If you do not agree with any of the above statements, you should return the product immediately. For more information please see our Terms and Conditions

01 Step 1: Lift the Vehicle

Place the truck in the highest setting and place the truck into jack mode. This is a safety measure to make sure that the ride height does not change while servicing the vehicle, while also providing additional clearance to some necessary access points.

02 Step 2: Remove Rear Diffuser

Using a 10mm Socket, loosen the following 7 bolts that secure the rear mid panel to the vehicle. Keep these bolts as they will be used later during reassembly.

INVINCIBLE CYBERTRUCK REAR SWAY BAR INSTALLATION0002
Next, using a 15mm socket, loosen the following 3 bolts to allow the rear mid panel to be removed from the vehicle. No need to fully remove these 3 bolts.

INVINCIBLE CYBERTRUCK REAR SWAY BAR INSTALLATION0003
Using a 10mm socket, remove the following 6 bolts securing the underside of the rear diffuser to the vehicle. Keep these bolts as they will be used later during reassembly.


Using a T30 torx bit, remove 3 bolts securing each side factory rear diffuser to the factory rear bumper cover. Keep these bolts as they will be used later during reassembly.


Using a clip removal tool, remove 4 push clips securing each factory rear fender liner to the factory rear diffuser as shown below.


Using a flat head screwdriver, rotate all 3 factory tow hitch cover retainer clips counterclockwise by 90 degrees as shown below.


Pull the tow hitch cover away from the vehicle in a swift like motion. Be sure to disengage all retainer tabs.

With the tow hitch now removed, proceed to the underside of the bumper to access where the hardware securing the diffuser to the rear bumper is located as shown below. Using a T30, remove both bolts securing the back side of the factory diffuser to the factory rear bumper cover. Keep these bolts as they will be used later during reassembly.


Using a clip removal tool, disconnect the following wiring harness from the factory rear diffuser as shown below.


Next, disconnect the rear speaker wiring harness to ensure the diffuser can be removed without damaging any cables.

INVINCIBLE CYBERTRUCK REAR SWAY BAR INSTALLATION0018
Now that most accessible power cables have been disconnected, proceed to disconnect the rear diffuser from the rear bumper. It may be helpful to have a second set of hands on the back side of the bumper to help disengage the retainer tabs securing the rear diffuser to the rear bumper. Be sure to support the diffuser after the clips are disengaged as there is 1 more cable assembly that needs to be disconnected before the diffuser can be pulled away from the vehicle.


Using a clip removal tool, disconnect the following wiring harness from the rear diffuser so that it may fall away from the rear bumper without damaging any accessories.

03 Step 3: Remove Factory Rear Sway Bar and Endlinks

Using a 15mm socket, remove each nut securing the factory endlinks to the factory lower control arms. Keep these nuts as they will be used later during reassembly.


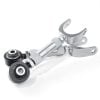
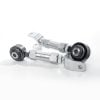
Using a pry tool, remove the rear wiring harness tab from the factory sway bar bracket and diffuser bracket.

INVINCIBLE CYBERTRUCK REAR SWAY BAR INSTALLATION0033

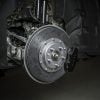
Using a 15mm socket, remove 2 bolts securing each factory rear sway bar bracket to the vehicle. Keep these bolts as they will be used later to secure the provided UP sway bar brackets to the vehicle.


Now that the sway bar is disconnected from the vehicle, carefully guide the sway bar away from the vehicle.


Using a 15mm socket, remove each nut securing the factory endlinks to the factory rear sway bar. Keep these nuts as they will be used later during reassembly.

04 Step 4: Assemble Rear Sway Bar

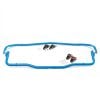
First, set the factory rear sway bar near the UP rear sway bar to ensure that the orientation is matched.

INVINCIBLE CYBERTRUCK REAR SWAY BAR INSTALLATION0047
Using the provided grease packet, apply grease evenly to each provided sway bar bushing as shown below.

INVINCIBLE CYBERTRUCK REAR SWAY BAR INSTALLATION0049
Next, carefully guide each sway bar bushing over each end of the UP rear sway bar as shown below. Be careful to not apply grease to the ends of the bar if possible as you want all grease to be applied in the intended usable location.

INVINCIBLE CYBERTRUCK REAR SWAY BAR INSTALLATION0050
Apply any excess grease left over either on the sway bar or in the grease packet onto the outside of the sway bar bushings.

INVINCIBLE CYBERTRUCK REAR SWAY BAR INSTALLATION0051

05 Step 5: Install UP Rear Sway Bar

Next, identify each sway bar setting as shown below.

INVINCIBLE CYBERTRUCK REAR SWAY BAR INSTALLATION0048
Using a 15mm socket, secure each endlink to the UP sway bar in the preferred setting using factory hardware.

INVINCIBLE CYBERTRUCK REAR SWAY BAR INSTALLATION0052
Once both endlinks have been installed on the UP rear sway bar, proceed to install the UP rear sway bar on the vehicle in the same orientation as the factory sway bar. Using a 15mm socket, loosely fasten 2 factory bolts and 2 provided washers to secure each UP rear sway bar bracket and backing plate to the vehicle.


With the sway bar loosely secured to the vehicle, proceed to loosely fasten both factory rear endlinks to the rear lower control arms using a 15mm socket.


Now that the sway bar and endlinks are loosely installed on the vehicle, it is time to apply final torque. Using a 15mm socket and a torque wrench, torque the UP rear sway bracket bolts to 36.9 ft/lbs while pushing the bar upward to maximize bar clearance during dynamic suspension movement.


Next, using a 15mm socket and torque wrench, torque to both endlinks to 33.2 ft/lbs.


Congratulations! Your UP INVINCIBLE rear sway bar has been successfully installed!

INVINCIBLE CYBERTRUCK REAR SWAY BAR INSTALLATION0072

06 Step 6: Reinstall Rear Diffuser

Now that the sway bar installation has been completed, it is time to reinstall the factory rear diffuser to the vehicle. Lift and hold the factory rear diffuser up to the factory rear bumper, and fasten 3 factory T30 bolts to secure each side of the rear diffuser to the factory rear bumper cover.


Once all hardware is loosely mounted, using a T30 torx bit and a torque wrench, torque to 4.4 ft/lbs.
Next, secure all wiring harnesses to the factory diffuser as shown below.


Next, secure the rear speaker cable assembly to the rear speaker.


Next, secure the factory push clips to secure the rear diffuser to each rear fender liner.

INVINCIBLE CYBERTRUCK REAR SWAY BAR INSTALLATION0081

Next, secure the factory tow hitch cover to the rear diffuser using the factory hardware by turning the 3 fasteners by 90 degrees as shown below.


Using a 10mm socket and a torque wrench, fasten 6 factory bolts to secure the underside of the factory diffuser to the vehicle. Torque to 4.4 ft/lbs.

INVINCIBLE CYBERTRUCK REAR SWAY BAR INSTALLATION0086
Using a 10mm socket, loosely secure the rear mid panel to the vehicle using factory hardware.

INVINCIBLE CYBERTRUCK REAR SWAY BAR INSTALLATION0087
Using a 10mm socket and a torque wrench, torque 7 bolts to 4.4 ft/lbs shown in red below.

INVINCIBLE CYBERTRUCK REAR SWAY BAR INSTALLATION0091
Using a 15mm socket and a torque wrench, torque 3 bolts to 51.6 ft/lbs shown in white below.

INVINCIBLE CYBERTRUCK REAR SWAY BAR INSTALLATION0091

Congratulations! Your UP INVINCIBLE rear sway bar installation is complete!

Unplugged Performance Reviews Section Footer Background Image

WHAT OUR CUSTOMERS SAY

RATED 4.97 Rating Star Rating Star Rating Star Rating Star Rating Star (308 REVIEWS)
LEAVE A REVIEW

With real reviews from real customers, shop UP products for your Tesla Model S, 3, X, Y and Cybertruck with confidence. Leave reviews and earn up to 2000 UP Rewards points each, redeemable towards exclusive UP Products.

Tesla Model S / Plaid - Superlight Carbon Ceramic Front Big Brake Kit (BBK)
RATED 5.0
Rating Star Rating Star Rating Star Rating Star Rating Star
Tesla Model S / Plaid - Superlight Carbon Ceramic Front Big Brake Kit (BBK)
I just had these bad boys installed on my Model S Plaid. It is INSANE how much stopping power these brakes provide. The stock brakes severely underperform in providing the stopping power needed to slow down the car. The solution to this problem is easily solved with UP's BBK. I want to give a big...
pharmd02 December 14, 2022
Tesla Model 3 Sport Pro Coilover Suspension Kit
RATED 5.0
Rating Star Rating Star Rating Star Rating Star Rating Star
Tesla Model 3 Sport Pro Coilover Suspension Kit
Best thing I’ve done to my Model 3- by far! Transformed the whole car. Looks better, rides better and handles so much better. Being able to just damping is awesome and super easy. Got these coilovers on in April and immediately drove it on a 4500 mile road trip and noticed the difference right...
zackfeldstein9 September 23, 2022
Tesla Model 3 Adjustable Front and Rear Sway Bar Set
RATED 5.0
Rating Star Rating Star Rating Star Rating Star Rating Star
Tesla Model 3 Adjustable Front and Rear Sway Bar Set
I have tracked my m3p twice now at road America and a local track blackhawk farms. The power to pull the car out of corners make it pretty competitive in stock form. The number one complaint was body roll and poor weight transfer into corners. The competition sways eliminated all of those concerns....
nfsu95 September 22, 2022
Unplugged Performance UP Emblem - Model S, 3, X, And Y
RATED 5.0
Rating Star Rating Star Rating Star Rating Star Rating Star
Unplugged Performance UP Emblem - Model S, 3, X, And Y
Great emblem to have installed and matches OEM emblems.
Christian N. December 04, 2025
Tesla Cybertruck Rear Sway Bar Upgrade (3-Way Adjustable with Poly Bushings)
RATED 5.0
Rating Star Rating Star Rating Star Rating Star Rating Star
Tesla Cybertruck Rear Sway Bar Upgrade (3-Way Adjustable with Poly Bushings)
Installed this on my CyberBeast in my own garage. The instructions provided were top notch with outstanding attention to detail. I installed the bar in the middle position. On the first turn I noticed the decrease in body roll. The turn in and mid turn stability is much improved. I am very...
nitrous87 June 17, 2025
Tesla Cybertruck HD Front Bumper - UP INVINCIBLE®
RATED 5.0
Rating Star Rating Star Rating Star Rating Star Rating Star
Tesla Cybertruck HD Front Bumper - UP INVINCIBLE®
Had UP install the HD front bumper with the 11" LEDs. Robust steel construction, makes the truck look more aggressive but lines remain clean. This bumper is what Tesla should have equipped the truck with out of the factory! LEDs are super bright as well. Simply the best looking, best designed,...
Megatron November 19, 2025
Tesla Model 3 / Performance - Dual Rate Linear Lowering Springs Set
RATED 5.0
Rating Star Rating Star Rating Star Rating Star Rating Star
Tesla Model 3 / Performance - Dual Rate Linear Lowering Springs Set
My 2022 3 Performance was a monster truck in stock form, wasn't pleased with the look or the softness. A car of this caliber shouldn't look this way and thank goodness Unplugged had the fix. I got their Moderate Springs and they are the perfect amount of drop to daily the car. They eliminate the...
850arrrsaylikepirate December 19, 2022
Tesla Model 3 2024+ Two-Piece Carbon Fiber Front Lip Spoiler (Splitter-Style)
RATED 5.0
Rating Star Rating Star Rating Star Rating Star Rating Star
Tesla Model 3 2024+ Two-Piece Carbon Fiber Front Lip Spoiler (Splitter-Style)
Perfect look and pairing with the high efficiency spoiler and rear diffuser trim on the Model 3 Highland. Shoutout to the Unplugged Performance team for making this happen.
Christian N. December 10, 2025
Tesla Model 3 / Model Y 20" UP x BBS Flugplatz Wheels (Single Wheels)
RATED 4.0
Rating Star Rating Star Rating Star Rating Star
Tesla Model 3 / Model Y 20" UP x BBS Flugplatz Wheels (Single Wheels)
I ordered my satin graphite UP x BBS Flugplatz wheels in March 2022 and got them delivered and installed in June 2022. The wheels were ceramic coated after delivery. I am running 255/35 Falken tires (all-seasons). These wheels have an amazing design and paint finish. They do a great job at exposing...
Kyle R. November 03, 2022
(2021 - 2026+) Tesla Model S / Model X - Pikes Peak Spec Rear Sealed Spherical 6pc Bushing Upgrade Kit
RATED 5.0
Rating Star Rating Star Rating Star Rating Star Rating Star
(2021 - 2026+) Tesla Model S / Model X - Pikes Peak Spec Rear Sealed Spherical 6pc Bushing Upgrade Kit
These bearings were installed for me by a shop that unplugged put me in touch with. Their service was excellent. The bearings were able to be installed with zero use of heat, unlike bearing kits for other cards and potentially from other brands. The road feel and confidence in the back end is...
Steven S. October 20, 2022
Unplugged Performance Newsletter
Subscribe to our Newsletter
Sign up to get the latest updates on UP Products, news, galleries and offers!
Please select all Tesla models you are interested in:
FEATURED IN
TeslaRati Logo 1
Automobile Magazine Logo 1
MotorTrend Logo 1
AutoBlog Logo 1
TopGear Logo 1
Car and Driver Logo 1
Road and Track Logo 1
The Drive Logo 1
AutoWeek Logo 1
The Joe Rogan Experience Logo 1
Unplugged Performance is the world leader in premium performance upgrades for Tesla vehicles. With our USA-made line of stylish and high-performance parts, our sole focus is on holistic development and improvement of all Tesla cars.
Unplugged Performance was founded and incubated by the team behind the world-renowned automotive customizer Bulletproof Automotive. Unplugged Performance is the world's leading company focused on the customization and sports performance of Tesla Motors vehicles.
All of our parts are researched and engineered on our own development vehicles with the intention of improving every aspect of the driving and ownership experience. Unplugged produces an exclusive range of premium upgrades to give a new sporty performance identity to Tesla Model S, Model X, Model 3, Model Y, and the Cybertruck.
Improving on perfection is no easy task, and to do so Unplugged products are professionally designed, prototyped, and manufactured in-house in Hawthorne, CA, and in collaboration with the best motorsports suppliers. The supercar performance of Tesla vehicles meets supercar-grade enhancements with Unplugged Performance.
GUARANTEED SAFE CHECKOUT WITH THESE PREMIUM PAYMENT OPTIONS
Payment Options - American Express, Discover, Visa, MasterCard, JCB, Maestro Credit Cards Payment Options - Apple Pay, PayPal, Splitit, Diners Club International, Union Pay Credit Cards
TESLA, TESLA MOTORS, and all related brands, marks and intellectual property including but not limited to TESLA ROADSTER, TESLA CYBERTRUCK, MODEL S, MODEL 3, MODEL X, MODEL Y, and the "TESLA," "T" logos designs are trademarks or registered trademarks of Tesla Motors, Inc. in the United States and other countries. Unplugged Performance has no official relationship with Tesla Motors.
THESE PRODUCTS CAN EXPOSE YOU TO CHEMICALS WHICH ARE KNOWN BY THE STATE OF CALIFORNIA TO CAUSE CANCER, OR BIRTH DEFECTS, OR OTHER REPRODUCTIVE HARM. FOR MORE INFORMATION PLEASE VISIT WWW.P65WARNINGS.CA.GOV
COPYRIGHT © 2026 UNPLUGGED PERFORMANCE®. ALL RIGHTS RESERVED.
THE UNPLUGGED PERFORMANCE® MARK AND LOGO ARE TRADEMARKS OF UNPLUGGED PERFORMANCE INC. ALL RIGHTS RESERVED. PLEASE REVIEW THE TERMS & CONDITIONS AND PRIVACY POLICY BEFORE USING OUR WEBSITE.
close