REFRESH FRONT FASCIA SYSTEM

IMPORTANT: READ BEFORE YOU BEGIN
These parts are intended to be installed by experienced professionals only, using industry-standard autobody refinishing techniques!
PLEASE NOTE: Prior to primering and painting the U.P. Refresh Front Fascia, make sure to test fit it to your vehicle, as well as properly clean / degrease the piece to remove any latent contamination from production or handling. Additionally, please note that the V-Stripe and emblem holder are shipped unpainted, and will need to either be primered & painted or vinyl-wrapped prior to final installation. We recommend that for vinyl-wrapped applications, these parts, as well as the Fascia should be prepped in a similar fashion to paint to ensure a smooth wrap-ready surface. In the event that, for cost or time savings, the cust omer desires to wrap the bumper without first painting, please take extreme caution and understand that an improperly prepped part may show small imperfections through the wrap.
By installing or using this product, you understand and agree with the following: If you do not agree, do not proceed with the installation and return this product within 30 days for a full refund of the purchase price from the company from which you have purchased it.
- I understand and agree that this product is intended to be installed for use on private roads and in jurisdictions where the use of this product is deemed legal by the local authorities. Furthermore, I understand and agree Unplugged Performance does not have any knowledge or control of regulations in my local jurisdiction, and it is up to me to determine if the product is acceptable for use with my vehicle.
- I understand that Unplugged Performance has done testing of this product on road and on closed racetracks but does not have the ability to test the vehicle for localized standards and regulations.
- I understand and agree that if the vehicle manufacturer determines that any Unplugged Performance products have contributed to a problem with the vehicle it may affect the vehicle’s warranty. Furthermore, I understand and agree that Unplugged Performance has no duty nor ability to be involved in internal manufacturer decisions.
- I understand and agree that if this product is given to an installer for installation on my vehicle, I have read and agreed with all the previous, even if I am not personally installing these parts on my vehicle. Furthermore, I understand and agree that this product should be installed by a trained professional that is familiar with both the vehicle as well as this product. Furthermore, I understand and agree that I and/or my chosen installer will follow the installation instructions carefully and dutifully test the vehicle post-installation in a safe and controlled environment to ensure proper operation.
- I understand and agree that by installing this product Unplugged Performance and all associated persons and entities as well as the vehicle manufacturer and all associated entities must be held harmless in the event of any suit, damages, or other legal action. Furthermore, I hereby release Unplugged Performance and any associated entities from any and all liability for any potential claim or claims.
If you do not agree with any of the above statements, you should return the product immediately. For more information please see our Terms and Conditions.

PLEASE NOTE:
Do not heat in curing process. We strongly recommend curing parts at room temperature.
REMOVE OEM FRONT BUMPER COVER
Front bumper cover removal is necessary prior to installation of the Refresh Front Fascia. To begin, open the hood for the front trunk. On either side you will see two(2) rubber bumper pads [FIGURE 1 – RED]. Unscrew these bumpers to remove them.
Once the rubber bump stops have been removed, grasp the large plastic covers [F1-BLUE] on either side and pull firmly up and towards the rear of the car to remove.
Remove the two(2) 10mm hex head bolts (F2-RED) and the two(2) plastic push-rivet clips (F2-ORANGE) located along the front edge of the front bumper cover.
Pull up firmly on the hood latch trim [GREEN] panel to release the remaining clips and remove it from the car.
(The black plastic / chrome scrape guard pieces will also be removed [F1-VIOLET].)
Next, remove the two(2) T25 Torx screws (F1-PINK) located at the edges of the front bumper cover in the wheel wells (the screw is visible behind the wheel well liner).
Using a 10mm wrench, remove the two bolts (F3-RED) attaching the front diffuser tabs to the chassis of the car.
On the underside of the OEM diffuser, there are several push-type plastic fasteners (F3-ORANGE) that attach the OEM front diffuser to the chassis. Using a flathead screwdriver or a clip / panel tool, remove these clips.
At this point, the front bumper cover and diffuser should only still be secured to the fenders on the left and right ends. Grasp each end and pull firmly out and away from the fenders to release the front bumper cover.


TRANSFER OEM LAMPS, LOUVERS + GRILLE
The motorized louvers [vents] attach to the OEM front bumper cover and must be transferred over to the Refresh Front Fascia. To uninstall, remove the two(2) screws attaching the louvers to the bumper cover, as well as the single(1) screw attaching it to the OEM front splitter.
The mounting bosses (F4-ORANGE) are left undrilled to accomodate for the small variances in the factory components. Holes will need to be drilled when transferring the OEM components to the Refresh Fascia. Prior to drilling, fit the OEM components to their respective locations on the Refresh Fascia and mark the hole locations. Once the optimal position is found, drill the appropriate holes (F4-RED) into the mounting bosses using an 1/8” (3.50mm) drill bit.
The OEM grille is attached with two screws on either side of the bumper cover opening. These two screws should be reused when attaching the grille to the Refresh Fascia.
Supplied are replacement parking sensor retainers / holders brackets (FIGURE 6). Like the OEM bumper cover, they are attached using 3M double-sided tape (max thickness ~1.0mm / .05”).
NOTE: Refer to FIGURE 5 to the above with regards to proper placement. When attaching the sensor holders, ensure the sensor is attached, as the predrilled holes feature a small step, which in combination with the parking sensor, is used to properly locate the hole and sensor. DO NOT INSTALL HOLDERS WITHOUT SENSORS.


Included with the Refresh Fascia is the V-Stripe / Grille Trim Assembly. This grille is installed via the integrated bumper cover tabs, as well as the addition of the single screw in the center of the Fascia.
Also included is the holder for the OEM Tesla “T” emblem.
NOTE: We recommend a two-toned paint finish for the V-Stripe section. Specifically, the back / top section in a satin black configuration, and the lower area paint-matched the vehicle’s exterior color (F7-BLACK & F7-GREEN V-STRIPE SECTIONS). (Many owners have also painted the entire V-Stripe piece black for the sporty, “blacked-out” look.

WARNING:
Please ensure that the lower Autopilot sensor (F8-BLACK) is not obstructed in any way, as any interference can cause damage to the A.P. system!
The removable emblem holder is used to place the Tesla emblem at the correct location, and is attached to the V-Stripe via two screws (F9-RED).
The OEM Tesla “T” emblem will now need to be transferred from the OEM nose cone to the emblem holder included with the Refresh Front Fascia (F9). To remove, we recommend the use of a heat gun and a thin string or plastic fishing line. To attach we recommend 3M VHB double-sided tape (if using VHB, make sure to apply 3M 94 Primer prior to affixing the tape to the surfaces).

RELOCATE EXTERIOR TEMP SENSOR


We recommend relocation of the OEM exterior temperature sensor for those that live in warmer climates in order to retain similar readouts to the OEM bumper cover.
To do so, simply unclip the sensor from the upper grille section. Using a razor blade, cut a small “X” shape into the top of the lower air duct (F10), and insert the sensor (F10-ORANGE).
NOTE: Prior to installing the Refresh Fascia to the vehicle, the Emergency Hood Release will need to be installed.
EMERGENCY HOOD RELEASE INSTALLATION


NOTE: Depending on the production date of the vehicle, Model S was available with two slightly differing methods of accessing the front trunk.
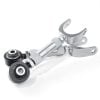
i. On some older vehicles, there is a single electronic latch, with a secondary, manual release which is activated by hand (F11-GREEN).
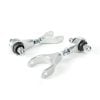
ii. On Model S vehicles produced around November / December 2015 and after, the system was updated to a completely electronic system, with dual motorized releases (F12).
iii. For vehicles with the older style hood release system, a single Unplugged Emergency Hood Release will be included with the Refresh Front Fascia.
For vehicles with the newer, electronic hood release, a dual-style Unplugged Emergency Hood release system will be included.
iv. The inner frunk trim panels must be removed for installation on all vehicles.
NOTE: Items v through ix outline installation on Model S vehicles with the older style hood release system. For vehicles with the dual electronic hood release system, refer to steps xiii through xviii.
EARLY MODEL S VEHICLES


v. Behind the frunk tub is the hood latch and its respective enclosure. To access this enclosure and the latch system, the frunk tub must be removed.
vi. A small hole (~1/2”) will need to be drilled in the right side of the enclosure in order to slip the end of the emergency hood release system’s cable through (F13a).
vii. Once the drilling is completed, pass the end of the cable through the hole and using the set screw, attach the one side of the supplied adapter to the OEM hood release cable, and the other to the UP hood release cable (F13a).
viii. Next, carefully run the cable to the right side of the vehicle along the front end module (FEM), using several of the supplied cable ties to attach the cable to the factory hood release cable (F13a-ORANGE).
ix. Next, with the OEM fender liner pulled back, find the small black 10mm hex head bolt at the lowest portion of the front end module and remove it.
Attach the retaining bracket (F14a-GREEN) of the hood release system at this point, reinstalling the 10mm hex head bolt (F14a-RED).
The loop (F14a-BLUE) should be tucked in such a way that in the event of a complete loss of vehicle power, the bottom of the fender liner can be pulled loose, and the loop readily accessed to release the hood latch.

LATE MODEL S VEHICLES
NOTE: For vehicles with the dual electronic OEM hood releases, start here:
x. The two OEM electronic hood release cables can be identified as seen in FIGURE 13b . Beginning with the right side OEM hood release, take the end of the UP Emergency Hood Release (F13b-BLUE), and using the set screw (F13b-VIOLET), attach the one side of the supplied adapter to the OEM hood release cable, and the other to the UP hood release cable (F13b-RED).
xi. Next, using two (2) of the supplied blue cable ties (F13b-ORANGE), secure the UP emergency hood release (F123-RED) to the OEM hood release cable, as pictured. (One tie wraps around the exterior of both cables, and prior to pulling it taught, the other is placed between the two cables and wrapped around both strands of the first cable tie and pulled tight.)
NOTE: Both cable ties must be pulled very taught!
xii. Carefully run the cable to the right side of the vehicle along the front end module (FEM), using several of the supplied cable ties to attach the UP Hood Release Cable to the factory hood release cable.
xiii. Next, with the OEM fender liner pulled back, find the small black 10mm hex head bolt at the lowest portion of the front end module and remove it.
Attach the retaining bracket of the hood release system (F14b-GREEN) at this point as pictured, reinstalling the 10mm hex head bolt (F14b-RED).
xiv. Moving on to the left side, carefully slip the swaged end of the UP Hood Release Cable behind the hood latch, and under the end of the factory hood release mechanism (F13b).
xv. Using another of the supplied cable ties, attach the UP Emergency Hood Release cable to the factory hood release (this should be fairly tight to prevent any slippage) (F13b).
xvi. Next, using two (2) of the supplied blue cable ties (F13b-ORANGE), secure the UP emergency hood release (F13b-RED) to the OEM hood release cable, as pictured. (One tie wraps around the exterior of both cables, and prior to pulling it taught, the other is placed between the two cables and wrapped around both strands of the first cable tie and pulled tight.)
NOTE: Both cable ties must be pulled very taught!
xvii. Carefully run the cable to the right side of the vehicle along the front end module (FEM), using several of the supplied cable ties as pictured to attach the UP Hood Release Cable to the factory hood release cable.
xviii. Next, with the OEM fender liner pulled back, find the small black 10mm hex head bolt at the lowest portion of the front end module and remove it. Attach the retaining bracket (F15-GREEN) of the hood release system at this point, reinstalling the 10mm hex head bolt (F15-RED).


COMPLETION
Finally, reinstall the factory panels to complete the installation.
Make sure to test functionality by closing the hood and pulling the loop to relase the latch. After testing is complete, don’t forget to hide the loop behind the bottom of the fender liner.
PLEASE NOTE:
MAKE SURE TO TORQUE WHEELS TO 129LBS/FT